All Categories
Featured
Table of Contents
- – Home Ac Repair Panorama City, CA
- – Instant Air Solutions
- – Air Condition Repair Panorama City, CA
- – Ductless Heating And Cooling Panorama City, CA
- – Furnace Repair Service Panorama City, CA
- – Heater Repair Panorama City, CA
- – Furnace Maintenance Service Panorama City, CA
- – Ductless Air Conditioner Panorama City, CA
- – Ductless Heating And Cooling Panorama City, CA
- – Furnace Installation Cost Panorama City, CA
- – Central Air Conditioning Systems Panorama Ci...
- – Heating And Air Conditioning Repair Panorama...
- – Heater Repair Panorama City, CA
- – Furnace Installation Cost Panorama City, CA
- – Instant Air Solutions
Home Ac Repair Panorama City, CA
Condensate drains pipes can run inside covers yet must exit promptly and considerably. Install the line set covers by attaching back plates and protecting the line collections.
Start with a clean, square cut and deburr the tubes very carefully, maintaining it aimed down to prevent particles (A C Service Panorama City). Use a guidebook or powered flaring device with a deepness quit and constantly include the flare nut before making a flare.
Air Condition Repair Panorama City, CA
Utilize the proper breaker, cable kind, and gaugeespecially for long runsand seal all wall infiltrations. Set up surge protection, tag breakers, and make sure interaction wiring is appropriate and continual. Before powering on, confirm voltage which the rise protector is active. Before finishing a heatpump installment, it's necessary to validate correct system procedure.
After that, run the system in both home heating and cooling down settings, gauging and taping inlet, outlet, and outdoor air temperatures. For multi-zone systems, confirm that each area's controls work effectively. If building and construction is ongoing, disconnect power and cover the indoor device to safeguard it from dirt and particles. Seal all wall infiltrations to protect against air leaks, dampness, and parasites.
Ductless Heating And Cooling Panorama City, CA
Secure all line set covers and gain access to panels, bewaring not to over-tighten screws. Tidy the device and work locations, tag the breaker clearly, and document all system information and checklist things before leaving the site. The final step in a heatpump installment is educating the client on system operation and maintenance.
Show them just how to tidy filters and maintain the outside system clear of particles. Review rise guard signs and outline what annual service includesinspections, coil cleansing, and leakage checksso they recognize how to keep the system running efficiently.
Warmth pumps are one of the most cost-effective ways to heat and cool a home. Warmth pumps are offered in a wide range of options.
Warmth rises While an indoor device may provide some heat to the flooring above, it won't send any type of heat to the flooring listed below. Similarly, cool air from a very first flooring unit in cooling mode will certainly not cool down floorings over it. Stairways A heatpump in one room may have the ability to heat a nearby room, yet not if there's a stairs rising in between them.
Furnace Repair Service Panorama City, CA
Integrating several heating unit in the same space can be challenging. If, for example, a boiler thermostat remains in a space heated up by a heatpump, then that boiler thermostat might never ever fall below its setpoint and may never ever request warmth. Because of this, various other areas served by the very same area (such as bedrooms served by the boiler yet not by the heatpump) may end up being cooler than wanted.
Height Indoor devices function well when installed high up on a wall but installing them as well high can make them hard to reach when it comes time to cleanse the filter or service the interior device. Right here are some factors to take into consideration when choosing an indoor system: Wall surface systems are without a doubt the most prominent.
Heater Repair Panorama City, CA
They are also one of the most noticeable. Flooring units are mounted on the wall surface down by the floor. They are less obvious, yet are not as effective. Their airflow can be obstructed by furniture, indicating that they may not have the ability to warmth and cool as large a room. Ceiling cassettes are installed above the ceiling and just their vents can be seen.
They are nearly undetectable, however often tend to be less reliable. These are usually set up in attic room floors or above put on hold ceilings. "Mini-Ducts" or "Compact Ducts" have an interior system located over the ceiling or below the floor that is attached by short runs of ductwork to several registers.
Furnace Maintenance Service Panorama City, CA
Because one interior device can be ducted to several registers, they can likewise be well fit to warming numerous little spaces like shower rooms and rooms. A typical configuration is an indoor system mounted in an insulated attic room connected to a grill in a hallway ceiling listed below. Hallway air is gone back to the unit, warmed or cooled, after that supplied to multiple adjacent spaces using ceiling vents.
Super-insulated homes with really small heating demands might be good candidates for a small mini-duct indoor system with air ducts throughout your home. Unlike mini-duct systems, centrally ducted systems can be utilized to heat up a whole home using one indoor device linked to a network of ducts. In some homes, centrally ducted warm pumps can make use of pre-existing forced warm air heater ductwork.

Here are some indicate bear in mind pertaining to ducted systems: While it is hassle-free to run ductwork via uninsulated components of a house (e.g., in an attic room over the insulation), it's finest to keep ductwork inside a home's insulation. If this isn't feasible, ductwork that goes through unconditioned space ought to be thoroughly shielded and sealed.
Filter ports that are developed right into ductwork ought to have an impermeable cover. All spaces connected by an air duct system will obtain heating/cooling based upon one common thermostat. "Balancing" a ducted system is the procedure of changing airflow to match the heating demand of each area. To allow balancing, a damper ought to be mounted for each and every space.
Ductless Air Conditioner Panorama City, CA
Below are some factors to consider: Visual appeals Exterior devices are most frequently mounted on or beside homes. Since exterior devices can be placed over fifty feet from their interior devices, they can be mounted on an inconspicuous side of the residence, under decks, and even far-removed from the home. Unobstructed air movement Although it's appealing to put units right into limited areas for visual factors, it is essential to keep in mind that they remove warmth from the exterior air.
Avoid shrubs, areas prone to snow drifts, and structures that might block air flow. It's also important to make certain outside units aren't blowing onto each other. Door, home window, and pathway interference It's finest to prevent setting up the outdoor system where it might hinder the operation of a door or window.
Make certain to pick a spot where that won't be an issue. Roofing system drainage If the outdoor unit is going to be mounted under a roof covering drip line, then make sure the unit is outfitted with a rainfall cap to decrease the risk of it icing up. Serviceability Bear in mind simplicity of solution when choosing a setup location.
Foundation brackets do the very best task at lessening noise and avoiding of the way of rakes, shovels, and mower. Ground stands decrease sound, yet can be susceptible to frost heaves if set up with inadequate drain. Wall surface installs keep units far from rakes, shovels, and lawn mowers, however can send a low hum inside.
Ductless Heating And Cooling Panorama City, CA
Nonetheless, if warm is only switched on in one room, a percentage of warm will certainly still be delivered to the other areas, potentially making some spaces awkward. Sizing When sizing a warm pump indoor or exterior device, bigger is not always much better. Smaller sized systems have a tendency to be extra efficient and can often do a much better work of heating and air conditioning than large units.
Some create warm to adverse 22 (no matter wind cool). Nonetheless, it might be extra sensible to mount warmth pumps to deal with all yet the most severe temperature levels and count on a combination of warmth pumps and additional heaters like a wood range, electric room heating units, etc for those uncommon events.
Indoor Heatpump interior units are connected to outdoor systems with copper tubes and electrical wiring called "line sets." Finding creative methods to simplify installations can save cash and boost aesthetic appeals (A C Service Panorama City). To minimize visible line sets inside and avoid the expense of covering wall surfaces and ceilings, line sets can be gone through closets, basement/attic staircases, attached garages, basements, crawlspaces, or attics
Furnace Installation Cost Panorama City, CA
Space heaters, electrical wall, and timber cooktops can be made use of if there are rooms not fully served by warmth pumps. This threat can be minimized with insulation, warm tape on at-risk pipelines, or area heating units set to keep the temperature level just above freezing.
With a heat pump, you can manage your heating and cooling down needs with simplicity. Setting up a heat pump is uncomplicated but does call for lots of steps.
If you're wondering what takes place during the process, we're below to provide you a step-by-step overview on just how to install a heat pump. A heatpump is an energy-efficient maker that cools and warms a home. The pump transfers warmth from outdoors to inside your home. This system allows you cozy your home in the winter months while cooling it in the summer season heat.
Central Air Conditioning Systems Panorama City, CA
Before getting a warmth pump, you'll require to consider several factors that will certainly aid you select the appropriate warmth pump for your home.
Provided that, you'll require to make your home's home heating and cooling systems more reliable to obtain the most out of a warmth pump setup. Smaller warmth pumps will battle to press heat via a big air duct system.
The external component requires some preparation on your part before you can install a new heatpump. If you have a home owners association (HOA), you might need authorization before any kind of home renovations. Guarantee your home has the space for the heatpump and tools required to mount it. You'll wish to have a clear timeline for the installation procedure so it does not disrupt your everyday life.
Heating And Air Conditioning Repair Panorama City, CA
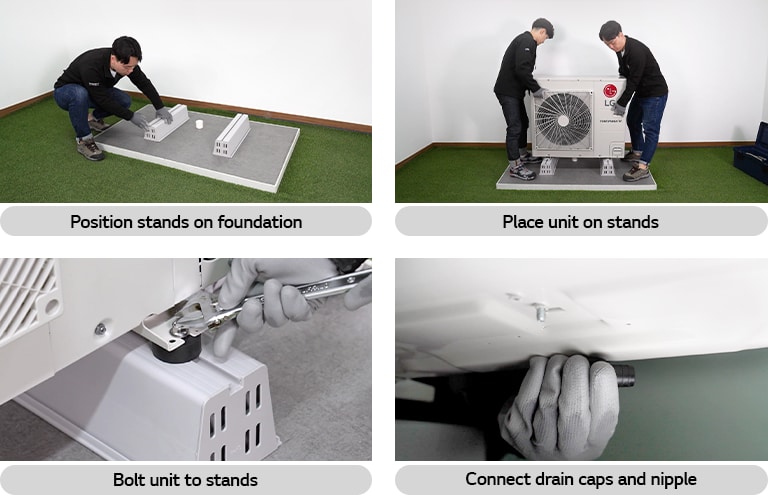
Level the space and set up a composite pad before placing the brand-new heat pump. Your warm pump consists of hazardous cooling agents, and it's illegal to air vent these chemicals into the ambience.
Since the old system has been securely gotten rid of, it's time to mount the substitute. Let's look at this vital component of how to mount a heatpump. Inside your home, the interior evaporator coil connects to the refrigerant lines of the heat pump system. Experts will certainly remove this device throughout the installment process.
The warmth pump is then attached to your home's electric system. As soon as linked, it's time to set up the thermostat by triggering the home heating and cooling of the pump.
You'll need to replace an old device prior to the brand-new system setup. It commonly takes about eight hours for a warmth pump to be totally installed.
Heater Repair Panorama City, CA
That lasts up to 45 minutes, throughout which time the pump runs and lets the refrigerant flow throughout the system. The installer tests the home heating, air conditioning, and defrost functions of the warm pump systems.
Now you recognize exactly how to set up a warm pump. A heat pump is one of the best means to heat and cool your home while reducing your electricity intake.
Furnace Installation Cost Panorama City, CA
Our seasoned a/c installment group is all set to mount your new warmth pump today. Get in touch with us today to find out more.
A heatpump is a system that can both heat and cool your home. In the winter season, it pulls heat from the outdoors air (even when it really feels cold) utilizing an unique liquid that soaks up the warmth. This liquid after that moves via the system, where a compressor increases its temperature level, and the warm air is released inside your home.
Instant Air Solutions
Address: 412 W Dryden St Apt 6 Glendale, CA 91202Phone: (747) 307-6363
Email: instantairsolutionsinc@gmail.com
Instant Air Solutions
There are great deals of various types of warm pumps, and each one has its own special requirements for installment. In general, nevertheless, installing your heat pump happens in three different steps.
Heater Repair Panorama City, CACommercial Exhaust System Installation Panorama City, CA
Ac Installation Panorama City, CA
Air Conditioning Installation Panorama City, CA
Air Condition Repair Panorama City, CA
Commercial Hvac Solutions Panorama City, CA
Air Conditioning Installation Panorama City, CA
Furnace Repair Service Panorama City, CA
Heating And Air Conditioning Repair Panorama City, CA
Air Condition Repair Panorama City, CA
Furnace Installation Cost Panorama City, CA
Ac Installation Panorama City, CA
Air Condition Repair Panorama City, CA
Ac Repairs Panorama City, CA
Air Conditioning Installation Near Me Panorama City, CA
A C Repair Panorama City, CA
Commercial Exhaust System Installation Panorama City, CA
A C Repair Panorama City, CA
Furnace Installation Cost Panorama City, CA
Heat Pump Repair Panorama City, CA
Heat Pump Repair Panorama City, CA
Ac Repairs Panorama City, CA
Furnace Maintenance Service Panorama City, CA
Air Conditioning Installation Near Me Panorama City, CA
Ac Repairs Panorama City, CA
Furnace Maintenance Service Panorama City, CA
Furnace Replacement Panorama City, CA
Commercial Exhaust System Installation Panorama City, CA
Ductless Heating And Cooling Panorama City, CA
Air Conditioner Repairs Panorama City, CA
Commercial Hvac Solutions Panorama City, CA
Air Conditioning Replacement Panorama City, CA
Heat Pump Installation Panorama City, CA
Finding A Good Seo Optimization Services Panorama City, CA
Near Seo Expert Panorama City, CA
A C Service Panorama City, CA
Instant Air Solutions
Table of Contents
- – Home Ac Repair Panorama City, CA
- – Instant Air Solutions
- – Air Condition Repair Panorama City, CA
- – Ductless Heating And Cooling Panorama City, CA
- – Furnace Repair Service Panorama City, CA
- – Heater Repair Panorama City, CA
- – Furnace Maintenance Service Panorama City, CA
- – Ductless Air Conditioner Panorama City, CA
- – Ductless Heating And Cooling Panorama City, CA
- – Furnace Installation Cost Panorama City, CA
- – Central Air Conditioning Systems Panorama Ci...
- – Heating And Air Conditioning Repair Panorama...
- – Heater Repair Panorama City, CA
- – Furnace Installation Cost Panorama City, CA
- – Instant Air Solutions
Latest Posts
Affordable Home Insurance For Seniors Laguna Niguel
Inexpensive Dental Insurance For Seniors Placentia
Santa Ana Children's Life Insurance Plans
More
Latest Posts
Affordable Home Insurance For Seniors Laguna Niguel
Inexpensive Dental Insurance For Seniors Placentia
Santa Ana Children's Life Insurance Plans