All Categories
Featured
Table of Contents
- – Pop Up Camper Repair Silverado, CA
- – OCRV Center
- – Camper Repair Shop Near Me Silverado, CA
- – Pop Up Camper Roof Repair Silverado, CA
- – Camper Trailer Service Near Me Silverado, CA
- – Camper Roof Repair Near Me Silverado, CA
- – Camper Roof Repair Near Me Silverado, CA
- – Camper Trailer Repair Near Me Silverado, CA
- – Camper Trailer Service Near Me Silverado, CA
- – Camper Awning Replacement Silverado, CA
- – Camper Trailer Repair Near Me Silverado, CA
- – Camper Service Silverado, CA
- – Pop Up Camper Roof Repair Silverado, CA
- – OCRV Center
Pop Up Camper Repair Silverado, CA
Most campers around us had their awnings released. We returned home yesterday in the rain, so today I deployed the awnings to dry them out.
It shows up that regarding 18 to 24 inches of the metal extrusion (gutter) that the awning is glided right into has actually retreated from the wall and twisted a bit - Silverado Rv Camper Repair. I'm thinking the repair service will entail replacing that entire length of rain gutter (10 feet?) and most likely using larger scale screws to change those that were taken out
We've obtained broken brackets on our camper awning. Two months earlier, we had a bad tire blow-out that caused a bent axle, major repairs, etc, and we wonder if the braces cracked/broke throughout the bouncy trip before we realized the axle remained in difficulty. We have not had the awning out given that it was in the store to be fixed.
Camper Repair Shop Near Me Silverado, CA
The awning itself, spring mechanism, and so on, is great. The back bracket assembly is great, however the front one is broken near the bottom and entirely broken through at the top, so that the top assistance arm no much longer fastens to the camper. We remain in problem. I don't want/like to camp without it.
Also the actual assistance arms are undamaged. They are white steel (? The actual arms are completely normal/functionalI'm just wanting to make sure we're not being taken in out of our desperation (Silverado Rv Camper Repair).
Pop Up Camper Roof Repair Silverado, CA
The RV is a 2007, but we had rainfall damages in 2010 and the whole awning was brand brand-new at that time. If absolutely nothing else, we would such as recommendations as to just how we can "jerry gear" this for a while - possibly also get us through the summertime - without having to put in a brand new awning!
If we have to go awning-less, we will, yet I prefer to find a fast and reliable option. Any person? Please!.
Welcome to my Motor Home Renovation Series!.?.!! I get on action 5 of changing the roofing of my '93 Fleetwood Jamboree Searcher motorhome. In the last action I got rid of the roof trim molding from 3 sides of the roofing. But in order to eliminate the 4th one, I need to eliminate the recreational vehicle awning also.
In order to replace the rubber roofing system and roof covering decking, I need to remove the awning. My RV awning has legs which pivot at the base yet can be gotten rid of to establish on the ground. First I drew these out. Pressing this bar launches the foot of the awning legs.
Camper Trailer Service Near Me Silverado, CA
You'll additionally discover exactly how the brace is hooked on top of the trim molding that holds down the fiberglass panel in the back edge. That's why the awning needs ahead off first before the final steps of this message (revealing the front and back edges of the roofing decking).
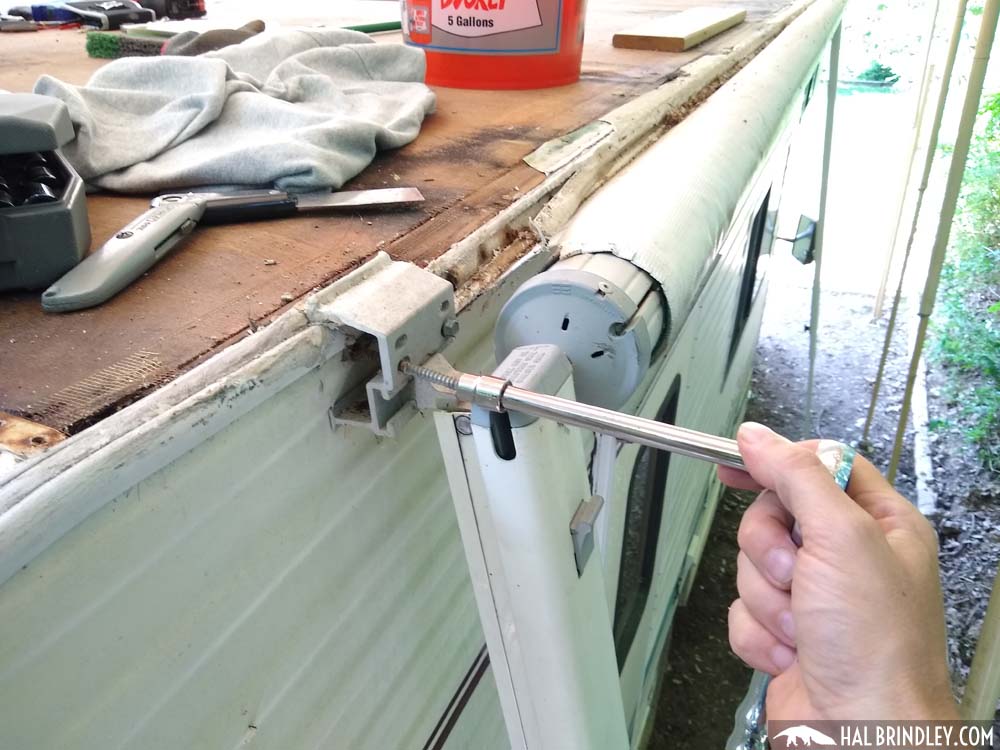
Right here's a detail of how the awning installing braces are screwed right into the camper. I really did not actually have to do this step till the awning was on the ground however I discovered this set screw below holding the awning canvas into the awning rail (there's one more at the appropriate end of the awning.) I went in advance and unscrewed it.
Once both screws are eliminated, simply draw back on the bracket. Unscrewing the big lag screws that hold the recreational vehicle awning mounting brackets to the camper (with a socket wrench) Removing the mounting brace once the lag screws have been unscrewed. Keep in mind exactly how this end was hooked over the termination bar that seals the spherical corner at the rear of the roof.
Both lag screws removed from the awning placing brace on the right. Removing the placing brace of the awning. As soon as the placing brackets are separated, it's time to eliminate the awning rail. Remember, the awning rail is generally just like a regular item of light weight aluminum roof edge trim molding except that near the bottom edge there is a round track with a port in it.
Camper Roof Repair Near Me Silverado, CA
To change the roof covering, this awning bar requires to be eliminated. Right here's a look at the circular network at the end of the awning rail. The canvas for the awning slides right into this track. Heads up! If you're just changing your awning and not fixing the entire roof like me, after that you would not require to get rid of the awning rail.
Going down the legs a couple of notches to reduce the entire awning. Now I can reach this trim molding (the awning rail) conveniently. Currently it's simply like getting rid of the side trim molding beyond of the camper. Take out the plastic insert that covers the screw heads (you may need to cut the end with an utility knife if it is put under the rail) and afterwards just pull it out.
You might have to cut the end with an energy knife if it is covered under. Just tug it out!
When the screws were out I started spying up the awning rail. (There will certainly be some butyl tape or putty sticking it to the rubber under.) HEADS UP! As soon as I began to tear off the awning rail, the entire point all of a sudden broke off and rolled up right into the awning like a window blind.
Camper Roof Repair Near Me Silverado, CA
Just understand it's coming! When the screws are removed, the awning rail can be torn up. You can see the side of the rubber roof that was secured under it. As soon as you begin drawing the awning rail away it will instantly snap totally free and roll up like a window blind with the awning.
This point is heavy so if you're functioning alone like me then lower it the ground bit by bit by strolling the legs away from the camper on each side one at a time up until you can lay it on the ground. I turned the legs back up and out of the means versus the camper.
I leaned the legs back against the camper. As soon as the awning was on the ground I got rid of the little collection screw at the ideal end of the awning, (I eliminated the one at the left end earlier.) These screws maintain the awning canvas from sliding in the rail. Once they're eliminated the rail simply slides straight off the canvas by moving the entire rail to one side.
Camper Trailer Repair Near Me Silverado, CA
When both set screws were eliminated I could glide the entire awning rail straight off the awning. Review at the account of this trim molding (the awning rail) after it was removed. Woo hoo! The awning is off! The last action prior to I can eliminate the old roofing system outdoor decking is to reveal completions of it where the fiberglass panels overlap it at the front and rear of the camper.
The following thing holding down the motor home fiberglass siding panels is the edge trim molding shown right here. It has a plastic screw cover strip put, so once again I simply tore up the vinyl insert and pulled out enough so I can unscrew some screw heads.
I may finish up removing it later if I require to replace the luan plywood beneath this fiberglass transition. The roof outdoor decking plywood extends under the fiberglass skin at the back of the camper. In order to replace it, this fiberglass transition must be raised. To raise that, the edge molding must be removed.
Then I could turn the trim mold off the side sufficient to lift up the side of the fiberglass panel. When I could turn that item of edge molding off the side, I started to tear up the fiberglass panel. It has adhesive under it and littles rusted staples and sheared off screws still holding it in position.
Camper Trailer Service Near Me Silverado, CA
At that point I switched over from a scrape to 6 inch vast taping blade. I loosened the various other corner trim in the same means, and bent it laterally just sufficient so that I can lift up the edge of the fiberglass panel.
I discovered a number of water damage in the plywood under the fiberglass panel so I'll probably be replacing it. Which suggests I'll finish eliminating those edge trim items right down nevertheless. However we'll reach that later on. I had a considerable amount of water damages in the joint in between the rounded edge and the roofing deck.
Camper Awning Replacement Silverado, CA
The side of the roof outdoor decking is exposed at the back of the camper! I've subjected the roof substrate at the back edge of the camper. Currently its time to discover the front side.
Once again, I pried that layer up as well (there had not been much quieting yet glue at this moment) and then I can pull out the remainder of the rubber roofing that was glued underneath it. Currently I can pull out the last little bit of rubber roof from beneath the fiberglass and luan plywood.
Camper Trailer Repair Near Me Silverado, CA
I saw there were no fasteners holding the roofing plywood down. I might see the blue styrofoam insulation underneath the damaged areas of luan plywood on the roof covering. Notification there are no bolts at all holding down the roofing plywood!
As soon as I scuffed up a few of the busted little bits I got hold of a solid item of plywood and began to draw. The whole thing began to bring up cleanly unharmed without damaging the foam board insulation at all. Currently I might see the steel framework beneath. Yet after that the plywood started peeling up as one item, leaving all the styrofoam well intact.
There is a steel strengthened tape on the base that joins the assemble. I don't know exactly how specifically they took care of to glue whatever down so well and obtain this tape joining them from the underside, however it was well done. The items of roofing ply are signed up with together at the seams below with a metal-reinforced tape.
Camper Service Silverado, CA
I quickly realized the roofing system was shedding strength and tightness as I drew up the top layer, so split it off simply before the very first seam. A close up of the metal framework in the roofing: one inch wide, one and a half inches high. Right here's a detail of the circuitry in the insulation foam and the solid timber reinforcements where the antennas screw right into the roofing.

I located a number of water damages in the plywood under the fiberglass panel so I'll most likely be changing it. Which implies I'll end removing those edge trim items all the way down besides. We'll obtain to that later on. I had a considerable quantity of water damage in the joint between the rounded edge and the roofing deck.
The side of the roof decking is subjected at the back of the camper! I've revealed the roof covering substrate at the back edge of the camper. Now its time to discover the front edge.
Once again, I pried that layer up as well (there had not been much quieting but glue at this moment) and afterwards I might pull out the remainder of the rubber roof covering that was glued underneath it. Silverado Rv Camper Repair. Currently I can pull out the last little rubber roof from below the fiberglass and luan plywood
Pop Up Camper Roof Repair Silverado, CA

I discovered there were no bolts holding the roof plywood down. I might see the blue styrofoam insulation below the damaged locations of luan plywood on the roof covering. Notification there are no bolts at all holding down the roof plywood!
Once I scraped up some of the busted bits I obtained hold of a strong piece of plywood and began to draw. The whole point started to pull up cleanly in one item without damaging the foam board insulation at all.
There is a metal strengthened tape under that joins the items with each other. I don't recognize exactly how exactly they managed to adhesive everything down so well and obtain this tape joining them from the bottom, however it was perfectly done. The items of roof covering ply are collaborated at the joints underneath with a metal-reinforced tape.
I quickly understood the roof covering was losing strength and tightness as I brought up the leading layer, so split it off prior to the first seam. A close up of the metal framework in the roof: one inch wide, one and a fifty percent inches high. Here's a detail of the electrical wiring in the insulation foam and the strong wood reinforcements where the antennas screw into the roofing.
Pop Up Camper Roof Repair Silverado, CAPop Up Camper Roof Repair Silverado, CA
Camper Service Near Me Silverado, CA
Camping Repair Near Me Silverado, CA
Camper Services Silverado, CA
Camper Repair Places Near Me Silverado, CA
Rv Camper Ac Repair Silverado, CA
Pop Up Camper Roof Repair Silverado, CA
Camper Trailer Service Near Me Silverado, CA
Rv Camper Repair Near Me Silverado, CA
Camper Repair And Service Silverado, CA
Pop Up Camper Roof Replacement Silverado, CA
Camper Repair Shop Near Me Silverado, CA
Camper Service Center Silverado, CA
Camper Air Conditioner Repair Near Me Silverado, CA
Camper Air Conditioner Repair Near Me Silverado, CA
Pop Up Camper Canvas Repair Silverado, CA
Camper Trailer Service Near Me Silverado, CA
Camper Repair Near Me Silverado, CA
Rv Camper Ac Repair Silverado, CA
Camper Awning Replacement Silverado, CA
Camper Trailer Repair Near Me Silverado, CA
Rv Camper Ac Repair Silverado, CA
Camper Repair Near Me Silverado, CA
Camper Service Center Silverado, CA
Camper Repair Shops Near Me Silverado, CA
Camper Repair Near Me Silverado, CA
Camper Awning Repair Silverado, CA
Camper Service And Repair Silverado, CA
Camper Air Conditioner Repair Near Me Silverado, CA
Pop Up Camper Roof Replacement Silverado, CA
Camper Repair Silverado, CA
Pop Up Camper Roof Replacement Silverado, CA
Camper Roof Replacement Silverado, CA
Pop Up Camper Roof Repair Silverado, CA
Camper Air Conditioner Repair Near Me Silverado, CA
Camper Service Near Me Silverado, CA
Camper Repair Near Me Silverado, CA
Camper Service Center Silverado, CA
Camper Awning Replacement Silverado, CA
Pop Up Camper Repair Silverado, CA
Camper Repair Shops Near Me Silverado, CA
Pop Up Camper Roof Repair Silverado, CA
Camper Services Silverado, CA
Pop Up Camper Roof Replacement Silverado, CA
Camper Trailer Repair Silverado, CA
Rv Camper Repair Silverado, CA
Camper Roof Repair Silverado, CA
Camper Roof Repair Silverado, CA
Camping Repair Near Me Silverado, CA
Rv Camper Repair Silverado, CA
Rv Camper Repair Near Me Silverado, CA
Pop Up Camper Roof Repair Silverado, CA
Camper Repair Places Near Me Silverado, CA
Rv Camper Repair Silverado, CA
Pop Up Camper Repair Silverado, CA
Rv Camper Repair Near Me Silverado, CA
Pop Up Camper Roof Repair Silverado, CA
Camper Roof Repair Near Me Silverado, CA
Camper Services Silverado, CA
Camper Roof Repair Near Me Silverado, CA
Camper Air Conditioner Repair Near Me Silverado, CA
Pop Up Camper Repair Near Me Silverado, CA
Camper Service Center Silverado, CA
Camper Repair And Service Silverado, CA
Camper Trailer Service Near Me Silverado, CA
Camper Repair Silverado, CA
Camper Repair Shops Near Me Silverado, CA
Camper Services Silverado, CA
Camper Repair Shop Silverado, CA
Camper Awning Replacement Silverado, CA
Camper Trailer Repair Silverado, CA
Camper Repair Shops Near Me Silverado, CA
Camper Service And Repair Silverado, CA
Camper Trailer Repair Silverado, CA
Camper Repair Near Me Silverado, CA
Camper Repair Silverado, CA
Camper Awning Replacement Silverado, CA
In My Area Seo Consultant Silverado, CA
Find Top Seo Company Silverado, CA
OCRV Center
Table of Contents
- – Pop Up Camper Repair Silverado, CA
- – OCRV Center
- – Camper Repair Shop Near Me Silverado, CA
- – Pop Up Camper Roof Repair Silverado, CA
- – Camper Trailer Service Near Me Silverado, CA
- – Camper Roof Repair Near Me Silverado, CA
- – Camper Roof Repair Near Me Silverado, CA
- – Camper Trailer Repair Near Me Silverado, CA
- – Camper Trailer Service Near Me Silverado, CA
- – Camper Awning Replacement Silverado, CA
- – Camper Trailer Repair Near Me Silverado, CA
- – Camper Service Silverado, CA
- – Pop Up Camper Roof Repair Silverado, CA
- – OCRV Center
Latest Posts
Senior Insurance Plans Garden Grove
Insurance Senior Citizens Rancho Santa Margarita
Fullerton Best Individual Health Insurance Plans
More
Latest Posts
Senior Insurance Plans Garden Grove
Insurance Senior Citizens Rancho Santa Margarita
Fullerton Best Individual Health Insurance Plans