All Categories
Featured
Table of Contents
Painting Rv Exterior Santa Ana, CA
If you're bound and established to eliminate the professionals and make this a DIY task, this little overview will establish you on the right track. A gear with a fresh layer of exterior recreational vehicle paint is a lovely point, specifically if you are in charge of it. Nonetheless, outside paints, specifically in recreational vehicle and marine applications, come with a level of clinical class.
When you atomize your paint with an HVLP or airless sprayer, it needs to bond to the surface area at a molecular level. The results will look amazing, at least till the initial bump comes along and a whole sheet of paint falls off.
It's typically less concerning the product of the sidewalls and more regarding the initial paint. A lot of customers leaping on the Do it yourself paint work bandwagon are enhancing an existing visual, not painting the raw fiberglass or light weight aluminum surface area of a Motor home.
Rv Paint Shop Near Me Santa Ana, CA
If you are painting the raw surface area, we've got you covered there too. Your substratum will certainly practically always be old paint unless you happen to be painting Recreational vehicles as they come off the production line. There are 2 things you require to recognize that are of miraculous value in regards to paint toughness, longevity, and a superb aesthetic: surface area prep and bonding guide.
Yes, it will certainly double the expense of a DO IT YOURSELF recreational vehicle paint job, however it will likewise conserve you a great deal of money and distress in the close to future. The remainder boils down to your overcoat of choice. However, which one is the most effective, and what do they all suggest? Polymer is a strong choice as an outside motor home paint, specifically if you're painting the raw surface area of a light weight aluminum motor home.
Since polymer is a thin paint, it will typically cost more for the added finishings. Polymer is typically used as a combination for outside paints, such as acrylic-enamel.Latex is a water-based paint and, for the longest time, oil-based paints have always been the go-to recreational vehicle exterior paint of option, or outside anything, for that issue.
Class A Rv Custom Paint And Repair Santa Ana, CA
It's tough to provide this set a strong 'yes,' though given that lasting stability is still ever before so a little up in the air.Enamel is oil-based and provides the thickest single coat of the lot. It dries gradually, however it likewise dries out hard, producing a protective covering. Its sluggish drying out time makes paint blunders fixable.
Conveniently one of the most flexible surface layers on the list, one-part polyurethane collaborate with wood, fiberglass, steel, light weight aluminum, and plastics. It offers UV security and minimizes the demand for shaving, thanks to its glossy coating. It additionally improves aerodynamic efficiency and is a solid waterproofing option. Surface preparation for polyurethane is a remarkably detailed and patient procedure, however.Two-part polyurethane has all the advantages of one-part polyurethane, other than the surface is harder, has a greater gloss appearance, and is a lot more expensive.Epoxy paints are the key exterior paints in U.S.If you're going for a super-glossy look, water-based is the incorrect option. Exterior recreational vehicle paint is all regarding surface area preparation. Without surface area prep, your overcoat may too be constructed from fairy floss. Since that's regarding what you'll obtain out of ita wildly vivid and attractive aesthetic, rapidly complied with by wreck, misery, and returning in with your in-laws. With appropriate surface prep, the exterior-grade paint you select will
be just how your RV offers itself to the world. There are a great deal of difficult options in the above checklist, and RVers will all be happy to tell you their very own individual choice. Ultimately, it's a matter of getting what you spend for. But that's not to say the various other options are wrong, just much less efficient in regards to durability . Marine quality might appear like it has nothing to do with Motor homes, however it does, in many methods. Watercrafts and RVs share lots of typical features. Some are light weight aluminum, and some are fiberglass. Both require UV security, waterproofing, rust resistance, adaptability, and a beneficial visual. While temperature influences the healing procedure of external recreational vehicle paint, there's still a window in which the majority of painting applications are optimum. You're great to go in temperature levels anywhere between 50F and 85F. Prior to you start, take notice of the weather condition, especially if you select an oil-based paint. Considering that they heal slower, the home window for disaster is larger. That will be extra difficult near the Gulf of Mexico, the Pacific Ocean, or the Atlantic Sea . In those cases, find an interior facility, head inland, or wait up until the fall. Prevent gusty problems whenever possible, especially if you're mosting likely to utilize a paint sprayer. This is where all the enjoyable science stuff begins. While bonding guide is typically believed of as the best need for a strong leading coat to adhere, it's.
Motorhome Paint Shops Santa Ana, CA
not. It's extremely essential, however it's not the end-all-be-all of the procedure. Not only do you have to sand every square inch of surface on your motor home, however you also need to sand your bonding primer. The majority of bonding guides will certainly give you with a 7-day home window for maximum overcoat adherence. When you return, make use of 220+ grit sandpaper to gently open up the guide and eliminate any kind of blemishes. Don't dig as well deep with the sandpaper, as you do not wish to inadvertently remove the bonding primer. The path to creating the most effective outside RV paint job begins and ends with a sprayer. The problem is not everybody is comfortable using one. Hold that trigger for also lengthy or obtain the pointer also near to the surface area, and things go.
southern quickly. If you choose to use a roller, a three-inch, high-density foam roller is the most effective selection. It produces the best coating without leaving tiny fibers that originate from wool rollers. This is critical to a successful surface. You should just make use of paint brushes for difficult-to-access areas and stick with the foam kind instead than the bristles. The bristles often tend to leave little rows behind, which looks negative when it treatments. Whatever you do, don't exaggerate it. Gravity antagonizes paint, just like whatever else. Place the pointer about 8 to 12 far from the surface area and relocate promptly with overlapping rows. The lady's speed (in the above video clip) is correct, yet, at times, her technique is not. At the 2:01 -minute mark, her technique is perfect, keeping an equal distance backwards and forwards the paint surface. It may appear unimportant, yet it creates whole rows of thin paint that sandwich rows of thick paint in between them. First and leading, ensure that there will certainly be no negative weather events, to the most effective of your ability, in the 24 hr following your paint job. For high-gloss or high-sheen coatings, don't wax it. For low-gloss or low-sheen paint work, really feel cost-free to wax the finished product. The most effective means to keep the visual and general appeal of your exterior recreational vehicle paint task is to frequently clean it. You don't need to go all wild and clean it every 2 or three days. Simply establish a regular and keep it tidy. A do it yourself outside recreational vehicle paint job isn't as lavish and revitalizing as it appears. The excellent information is that absolutely nothing that looks amazing ever before originates from little initiative. You can constantly get an expert to do it. There are marine industrial painters and automobile detailers who would certainly love to do it. Plus, we share leading product suggestions so your camper appears looking fresh. For recommendation, I use base color to repaint roughly. That lines up with the estimated needed for complete coverage. This consisted of, with some overlap and normal overspray waste. Below is a basic price quote of just how much paint you'll require to cover the. To provide both gears a fresh make over, this is the external painting method that we advise. Intend to check out both remodellings? Below is the 2007 Keystone Hornet and the 2005 Keystone Hornet. Here is just how to repaint your recreational vehicle's exterior. 1 Beginning by offering your motor home a good clean to remove any dust, dirt, or road crud.
Rv Painting Santa Ana, CA
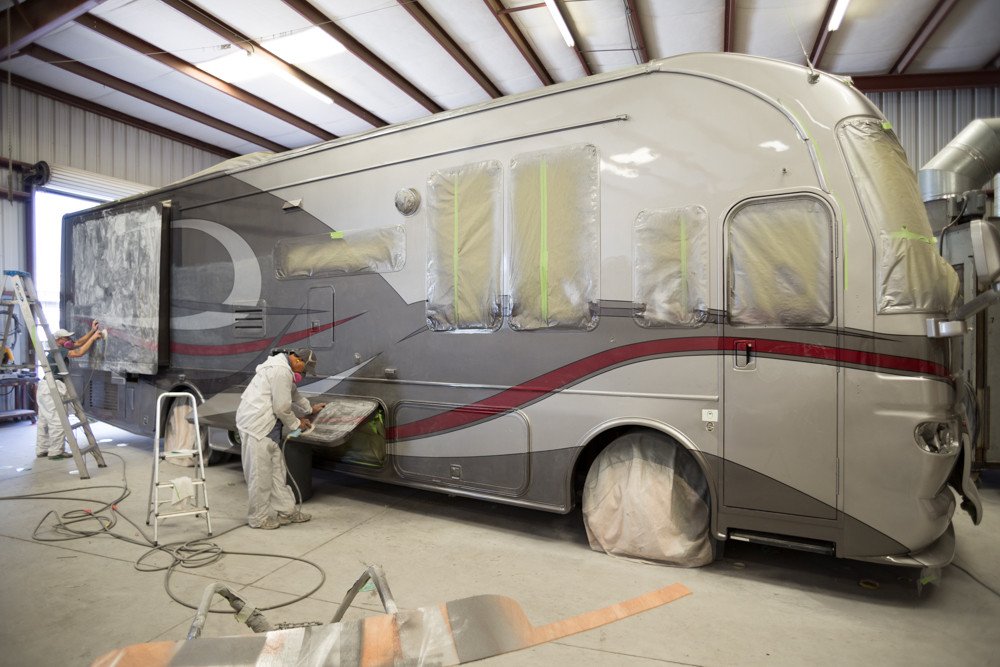
There's no right or incorrect solution when it comes to picking a professional RV paint job or going the Do it yourself paint path. If you choose to obtain your paint done expertly and are looking for a costs, high-grade service, inspect out CDI Custom Paint today and get a quote. If you would like to attempt to eliminate the stickers, you will desire to try the adhering to products: The appropriate way to repaint a RV exterior includes getting rid of decals, power cleaning, taping and covering windows and then spraying on an automobile grade paint with a paint sprayer.
Rv Painter Santa Ana, CA
I believe eliminating stickers from a smooth-sided trailer is easier. I will constantly evaluate stickers and attempt to remove them, yet if they look like they aren't going anywhere and the camper is even more than 20 years old, I will likely just paint over them.
Those things would certainly NOT come off. Currently, the siding on that particular particular trailer was wavy, not smooth. I believe eliminating stickers from a smooth-sided trailer is simpler. I pledged that day never ever to lose that much time once again. I will certainly always check stickers and attempt to remove them, but if they appear like they aren't going anywhere and the camper is greater than 20 years old, I will likely simply repaint over them.
Rv Painting Near Me Santa Ana, CA
I assume getting rid of decals from a smooth-sided trailer is less complicated. I will certainly constantly inspect stickers and effort to remove them, yet if they look like they aren't going anywhere and the camper is more than 20 years old, I will likely just paint over them.
I believe eliminating decals from a smooth-sided trailer is less complicated. I will certainly always check stickers and attempt to remove them, however if they look like they aren't going anywhere and the camper is even more than 20 years old, I will likely just paint over them.
OCRV Center
Address: 23281 La Palma Ave Yorba Linda, CA 92887Phone: (714) 909-1444
Email: art@ocrvcenter.com
OCRV Center
I think removing stickers from a smooth-sided trailer is much easier. I will certainly constantly evaluate stickers and attempt to remove them, but if they look like they aren't going anywhere and the camper is even more than 20 years old, I will likely simply repaint over them.
Rv Paint Santa Ana, CAPainting Rv Santa Ana, CA
Paint Fiberglass Rv Santa Ana, CA
Motorhome Painting Near Me Santa Ana, CA
Rv Paint Job Santa Ana, CA
Painting An Rv Santa Ana, CA
Painting An Rv Santa Ana, CA
Motorhome Paint Repair Santa Ana, CA
Rv Painter Santa Ana, CA
Painting Fiberglass Motorhome Santa Ana, CA
Painting Rv Santa Ana, CA
Painting An Rv Santa Ana, CA
Painting Fiberglass Motorhome Santa Ana, CA
Motorhome Custom Paint Jobs Santa Ana, CA
Rv Painting Santa Ana, CA
Custom Rv Paint Santa Ana, CA
Rv Paint And Body Shops Near Me Santa Ana, CA
Rv Paint Santa Ana, CA
Rv Exterior Paint Santa Ana, CA
Paint Fiberglass Rv Santa Ana, CA
Rv Painting Near Me Santa Ana, CA
Rv Painter Santa Ana, CA
Painting Fiberglass Motorhome Santa Ana, CA
Rv Paint Job Santa Ana, CA
Rv Painting Santa Ana, CA
Rv Painting Near Me Santa Ana, CA
Class A Rv Custom Paint And Repair Santa Ana, CA
Rv Paint Shops Near Me Santa Ana, CA
Rv Painting Santa Ana, CA
Rv Paint And Body Shops Near Me Santa Ana, CA
Paint Rv Santa Ana, CA
Rv Exterior Paint Santa Ana, CA
Rv Paint And Repair Santa Ana, CA
Rv Paint Shops Near Me Santa Ana, CA
Rv Paint Job Santa Ana, CA
Rv Exterior Paint Santa Ana, CA
Motorhome Painting Near Me Santa Ana, CA
Custom Motorhome Paint Jobs Santa Ana, CA
Rv Paint Job Santa Ana, CA
Painting An Rv Santa Ana, CA
Painting Rv Exterior Santa Ana, CA
Rv Paint Job Santa Ana, CA
Rv Paint Santa Ana, CA
Painting Fiberglass Motorhome Santa Ana, CA
Rv Painting Near Me Santa Ana, CA
Rv Exterior Paint Santa Ana, CA
Motorhome Paint Repair Santa Ana, CA
Custom Painted Motorhomes Santa Ana, CA
Custom Motorhome Paint Jobs Santa Ana, CA
Class A Rv Custom Paint And Repair Santa Ana, CA
Rv Paint And Body Shops Near Me Santa Ana, CA
Rv Painting Near Me Santa Ana, CA
Motorhome Custom Paint Santa Ana, CA
Rv Exterior Paint Santa Ana, CA
Painting Fiberglass Motorhome Santa Ana, CA
Paint Fiberglass Rv Santa Ana, CA
Rv Paint And Body Shops Near Me Santa Ana, CA
Rv Paint Santa Ana, CA
Painting Rv Walls Santa Ana, CA
Painting An Rv Santa Ana, CA
Rv Painting Santa Ana, CA
Rv Exterior Paint Santa Ana, CA
Rv Paint Job Santa Ana, CA
Rv Exterior Paint Santa Ana, CA
Class A Rv Custom Paint And Repair Santa Ana, CA
Painting Rv Walls Santa Ana, CA
Rv Paint Santa Ana, CA
Rv Painting Near Me Santa Ana, CA
Rv Exterior Paint Santa Ana, CA
Rv Painting Near Me Santa Ana, CA
Custom Motorhome Paint Jobs Santa Ana, CA
Paint Motorhome Exterior Santa Ana, CA
Rv Paint Shop Near Me Santa Ana, CA
Painting An Rv Santa Ana, CA
Custom Rv Paint Jobs Santa Ana, CA
Custom Painted Motorhomes Santa Ana, CA
Rv Paint Shop Near Me Santa Ana, CA
Custom Rv Paint Jobs Santa Ana, CA
Finding A Good Local Seo For Small Business Santa Ana, CA
Best Seo Services For Small Business Santa Ana, CA
Motorhome Paint Shops Santa Ana, CA
OCRV Center
Latest Posts
Trailer Window Replacement Walnut
Brea Rv Trailer Repair Near Me
Motorhome Custom Paint Jobs Garden Grove