All Categories
Featured
Table of Contents
- – Motorhome Refrigerator Repair Villa Park, CA
- – OCRV Center
- – Rv Repair Places Near Me Villa Park, CA
- – Rv Floor Repair Near Me Villa Park, CA
- – Rv Mechanics Near Me Villa Park, CA
- – Rv Repairs Near Me Villa Park, CA
- – Rv Repair Centers Near Me Villa Park, CA
- – Rv Repair Service Near Me Villa Park, CA
- – Rv Solar Panel Installation Villa Park, CA
- – Camper Ac Repair Near Me Villa Park, CA
- – Motorhome Generator Repair Near Me Villa Par...
- – Rv Plumbing Repair Near Me Villa Park, CA
- – Motorhome Service And Repair Near Me Villa P...
- – Motorhome Repair Shops Villa Park, CA
- – Motorhome Generator Repair Near Me Villa Par...
- – Motorhome Repair Service Villa Park, CA
- – Rv Floor Repair Near Me Villa Park, CA
- – OCRV Center
Motorhome Refrigerator Repair Villa Park, CA
I used items from The Rot Physician. They were very handy in reviewing my alternatives and in explaining the techniques to used their items.
I made use of a box blade to cut the rubber roofing in the corner. It most likely dripped from the time the unit was new, as the roofing was extremely soft in this corner, and we've been in dry spell conditions for 2 years.
Rv Repair Places Near Me Villa Park, CA
Folding back the rubber disclosed the rotten location. Below I've already cleaned out what soft decomposed wood I can with my bare hands. Next I reduced a diagonal with a keyhole saw to clean up the side where it was feathered from rot. 3. I cut an item of plywood like a puzzle to match the shape of the hole I made in the roofing system.
Right here's the sprayer I used to use the CPES * from The Rot Physician. With its 18 steel "wand" I can penetrate right into the 2 area between the roof and the ceiling.
Rv Floor Repair Near Me Villa Park, CA
Right here's the finished roofing system secured up with Eternabond tape. I ran a strip of Eternabond all the method throughout the camper where the roofing meets the endcap. I likewise had rot in the wall straight listed below the location on the roof.
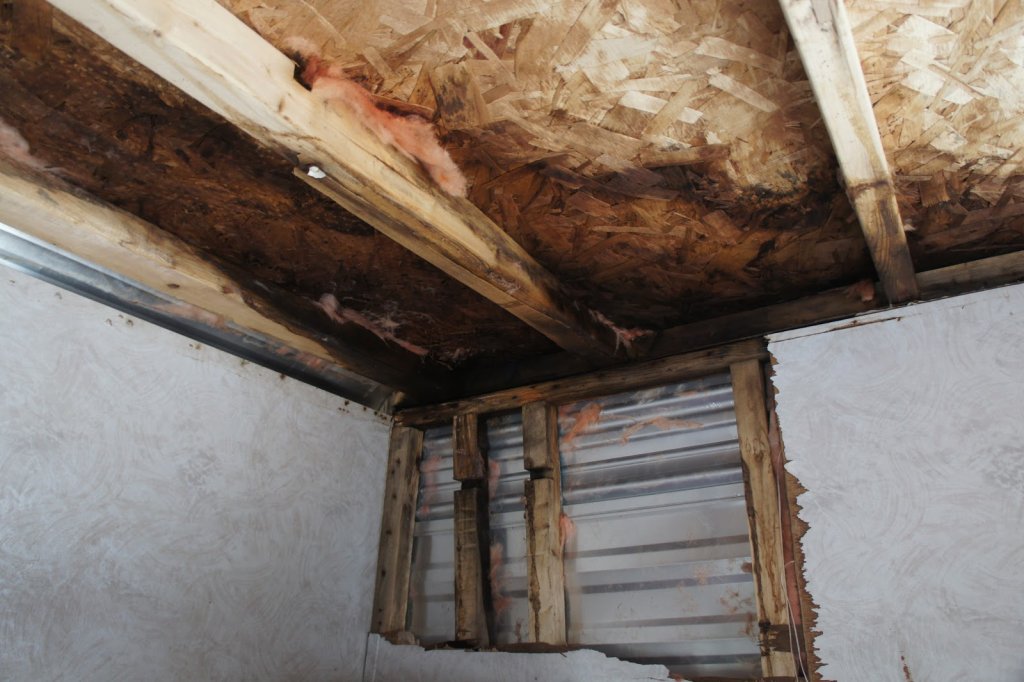
Below I've removed the wall surface material and damp insulation to disclose the location affected. 8. I extensively dried the location for numerous days utilizing the exhaust side of a tiny vacuum, inserting the hose in between the inner and external wall surfaces. When it was thoroughly completely dry I covered whatever with CPES *, making use of the insect sprayer to penetrate into or else unattainable areas.
Note the leading 3-4 of the stud was entirely decayed away. I spread out Fill-It Epoxy Filler * throughout the area. The things goes on like a thick and sticky gel, then dries out to a very tough product that bonds to the CPES * I had sprayed onto the timber.
Rv Mechanics Near Me Villa Park, CA
Finally, here's the ended up item. Overall price had to do with $200.00 plus a number of hours of my time. * These items are inaccessible, we are selling comparable items that will certainly execute these exact same tasks. Feel totally free to call us if you require support with which products to use.
Possessing an entertainment automobile (RECREATIONAL VEHICLE) is a dream for numerous, giving the liberty to explore the open roadway with all the comforts of home. Nonetheless, like any type of home, a recreational vehicle needs normal maintenance. One common concern that motor home proprietors come across is a leaky roofing. If left neglected, a roof leakage can cause considerable damages and pricey repair services.
Rv Repairs Near Me Villa Park, CA
Motor home roofings are subjected to severe conditions, from blistering sunshine to hefty rainfalls, snow, and also hail. The continuous resonance and activity when on the road can additionally emphasize the roofing system, leading to potential leaks. Routine maintenance and evaluations are vital in identifying any arising problems and resolving them prior to they rise right into bigger issues.
You can do this by very carefully checking out the interior and exterior of the Recreational vehicle for indicators of water damage. Inside the Motor home, look for water stains on the ceiling, walls and floor edges.
Covering your motor home roofing system with a tarpaulin is the easiest and quickest momentary fix. Ensure the tarp is tight to stop it from being lifted by the wind, which could create more damage. Bear in mind to avoid running your HVAC system or kitchen area appliances when your RV is tarped as it can possibly block vents and enhance the threat of CO2 build-up or intensify leaks.
These are generally readily available at RV supply stores and are easy to use adhering to the instructions provided. After applying a short-lived solution, use an electrical heating system, dehumidifier, or sturdy fan to dry out the inside of your RV as a lot as feasible. This aids prevent the growth of mold and mildew, which can result in illness and further damage to your RV.
Rv Repair Centers Near Me Villa Park, CA
There are various kinds of recreational vehicle roofs, each requiring various fixing methods. This guide will focus on one of the most usual types. EPDM (Ethylene Propylene Diene Monomer) and TPO (Thermoplastic Polyolefin) are preferred selections for RV roofings due to their longevity and resistance to UV rays. Both types are available in rolls and are used using glue and heat welding for a watertight seal.
For a fast and efficient option to a dripping recreational vehicle roof, consider using Ziollo's one-weekend reconstruction package. This set includes all the materials you need to fix your motor home roofing system in simply a weekend break, enabling you to hit the open roadway earlier. With straightforward directions and premium products, this package uses a reputable solution for do it yourself lovers.
Mike with Recreational Vehicle Roofing Repair service Florida stands behind his product 100% and he offers a twenty years service warranty for roofing system work which is quite outstanding. The solution was really great and my only gripe was a miscommunication on pricing over the phone, yet Mike Learn more - A. Individual
Owning a motor home uses liberty and experience, yet it also includes a fair share of upkeep duties. Among the most essential jobs for recreational vehicle proprietors is preserving the integrity of the roof. A leaky RV roofing system can lead to comprehensive interior damages, mold development, and also structural issues if left unattended.
Rv Repair Service Near Me Villa Park, CA
Otherwise resolved, water breach can cause: Delamination of wall surfaces and ceiling By doing normal inspections and recognizing how to manage RV roof covering repair service, you can extend the life of your car and avoid costly damage - Rv Repairs Near Me Villa Park. Prior to you can repair a leak, you require to locate it. This can be more difficult than it sounds, as water commonly takes a trip far from the entry factor before showing visible indicators
Look for fractures, soft places, punctures, or worn-out caulking around seams, vents, skylights, and antennas. Analyze the sides of the roof covering where it satisfies the wall surfaces. These areas are particularly prone to leakages. Inside the RV, try to find discoloration or sagging in the ceiling. Check around roof-mounted devices for indicators of water.
Rv Solar Panel Installation Villa Park, CA
Use a garden hose to run water over little sections of the roof while a person is inside looking for leakages. This "regulated leak examination" can assist pinpoint the source. Cleaning the repair work location guarantees far better bond of sealers and patch materials. Soft-bristle brush or sponge Mild soap or specialized motor home roofing system cleaner Water hose or bucket Lint-free fabrics or rags Get rid of any fallen leaves, sticks, or dirt.
Apply adhesive to the bottom and press the patch strongly into area. Seal the sides with lap sealer. Take into consideration making use of a fluid roof covering finishing: Cover up off locations not to be coated. Mix and put the covering equally throughout the roofing. Utilize a roller to spread it in an uniform layer.
Camper Ac Repair Near Me Villa Park, CA
Make use of a flashlight to evaluate the interior ceiling. Prevent car parking under trees where arm or legs and sap can damage the roof covering. While several Motor home roof covering fixings can be Do it yourself projects, some circumstances need specialist assistance: Structural damage or major roofing system sagging Large, concealed leaks that are hard to map Complete membrane substitute Insurance-related repairs Finding out how to perform a RV roof covering repair work encourages you to shield your financial investment, conserve cash, and prevent mid-trip calamities.
Great Day every person Has any person attempted to infuse or Iron a ceiling bubble on a rv before and if so what item did you utilize or recommend to make use of. Any kind of concepts would be greatful, I just have a completely dry bubble in the ceiling of the cupboard. I re caulked the roofing out side just incase it was water.
Just the vinyl bubbled a bit or whatever that material is on those panels. Incredible any type of pointers are much appreciated thank you once again every person.
Motorhome Generator Repair Near Me Villa Park, CA
Hey there all, I assume I got myself in over my head and need a life vest. There is some prior leak (considering that I have had the rig, the roof covering has actually been secured effectively) around the bathroom air vent. I started to get rid of component of the timber that is decomposed and discovered decomposed wood throughout the bathroom and back room.
Currently the ceiling is uneven- Some locations need to be filled to level out with various other locations. Do I spackle these areas or replace those locations with the same type of wood Winnebago makes use of? I have actually checked out other concepts like positioning plastic floor covering on the ceiling, fiberglass and so on.
Rv Plumbing Repair Near Me Villa Park, CA
Professional Grade is fantastic things. Specifically for little areas - like RV/TTs and you plan to maintain your TT for 5+ years.
Rather than just using beadboard, they added wood slabs to create even more measurement and visual rate of interest to the ceiling. This magnificently embellished ceiling looks as extravagant as the remainder of this motorhome! Wish to recreate the look in your very own recreational vehicle? You'll require a couple of tools before beginning. A circular saw and jigsaw are essential for reducing your beadboard to size and reducing any type of openings needed to fit light components or air vents.
Motorhome Service And Repair Near Me Villa Park, CA
Epoxy was poured into mold and mildews on the ground before being mounted on the ceiling. The rest of the ceiling was repainted "Iron Ore" in shade and LED rope lights and light timber trim were added. For much more on just how you can make your very own epoxy components in your RV, read how this spaceship was built here. This small trailer utilized timber slabs to develop a shiplap-like result on the ceiling.
Image Credit History: Kento Eyre In this Recreational vehicle remodelled by the pros at Wayland Ventures, simple stained 2x6s develop beam of lights that run throughout the ceiling.!! To cover up the normally bent roofing of the bus, proprietor Andy mounted wood paneling across parts of his RV ceiling.
Motorhome Repair Shops Villa Park, CA
This Argosy restoration used ornamental ceiling tiles like this to produce a beautiful ceiling. Photo Credit Report Terri Closs Below is what the owner, Terri, had to state concerning this ceiling! "Tin ceilings are infamously heavy. We wanted the look yet really did not desire the weight so we pick 2' x 4' vinyl, glue-up panels in a Victorian style.
"That ceiling ceramic tile was mounted by wood molding down the size of the trailer with a flexible resin molding complying with the curve of the ceiling. Installment was a challenge. Exactly how do you hold these ceiling ceramic tiles in area while the glue dries out? Remedy: you make use of a wonderful lots of versatile wood springtime poles to pin each piece to the ceiling while it dries out.
Motorhome Generator Repair Near Me Villa Park, CA
If you can picture, some areas were tarnished others not. Now the ceiling is unequal- Some areas need to be filled up to level out with other areas. Do I spackle these locations or replace those locations with the same sort of timber Winnebago uses? I have checked out various other ideas like placing vinyl floor covering on the ceiling, fiberglass etc. Resembles I will require to re "kilz," the rig. Thanks for any type of aid.
And indeed, I would certainly do it once more - readily. Professional Quality is impressive things. Especially for tiny locations - like RV/TTs and you plan to keep your TT for 5+ years. re: - visit this site - Hope this helps.
Motorhome Repair Service Villa Park, CA
Instead of just making use of beadboard, they included wooden slabs to create more dimension and visual passion to the ceiling. This beautifully embellished ceiling looks as lavish as the remainder of this motorhome!
Epoxy was poured right into molds on the ground prior to being installed on the ceiling. The remainder of the ceiling was repainted "Iron Ore" in color and LED rope lights and light wood trim were included. For more on exactly how you can make your own epoxy components in your motor home, read just how this spaceship was constructed below. This small trailer utilized wood planks to produce a shiplap-like impact on the ceiling.
Rv Floor Repair Near Me Villa Park, CA

Image Credit Score: Kento Eyre In this Motor home remodelled by the pros at Wayland Ventures, straightforward stained 2x6s produce light beams that run throughout the ceiling.!! To cover up the naturally curved roofing system of the bus, owner Andy installed wood paneling across parts of his Recreational vehicle ceiling.
This Argosy remodelling utilized ornamental ceiling ceramic tiles similar to this to create an attractive ceiling. Image Credit Rating Terri Closs Here is what the proprietor, Terri, needed to state regarding this ceiling! "Tin ceilings are notoriously hefty. We desired the appearance but didn't want the weight so we choose 2' x 4' vinyl, glue-up panels in a Victorian design.
OCRV Center
Address: 23281 La Palma Ave Yorba Linda, CA 92887Phone: (714) 909-1444
Email: art@ocrvcenter.com
OCRV Center
"That ceiling floor tile was mounted by timber molding down the size of the trailer with a flexible material molding complying with the contour of the ceiling. Installation was a challenge. How do you hold these ceiling tiles in position while the glue dries out? Solution: you make use of an excellent numerous flexible wood springtime posts to pin each item to the ceiling while it dries out.
Rv Refrigerator Repair Near Me Villa Park, CARv Repair In My Area Villa Park, CA
Rv Repair Centers Near Me Villa Park, CA
Rv Repair In My Area Villa Park, CA
Best Rv Repair Near Me Villa Park, CA
Rv Repair And Service Near Me Villa Park, CA
Rv Repair Centers Near Me Villa Park, CA
Rv Repair Service Near Me Villa Park, CA
Rv Floor Repair Near Me Villa Park, CA
Motorhome Repair Service Villa Park, CA
Motorhome Generator Repair Near Me Villa Park, CA
Rv Floor Repair Near Me Villa Park, CA
Best Rv Repair Near Me Villa Park, CA
Rv Solar Panel Installation Villa Park, CA
Rv Repair Services Near Me Villa Park, CA
Rv Ceiling Repair Villa Park, CA
Rv Repair In My Area Villa Park, CA
Rv Repair Services Near Me Villa Park, CA
Rv Repair And Service Near Me Villa Park, CA
Rv Repair Service Near Me Villa Park, CA
Motorhome Awning Repair Villa Park, CA
Rv Repair Services Near Me Villa Park, CA
Rv Solar Installation Villa Park, CA
Motorhome Service And Repair Near Me Villa Park, CA
Camper Ac Repair Near Me Villa Park, CA
Rv Plumbing Repair Near Me Villa Park, CA
Rv Repair And Service Near Me Villa Park, CA
Rv Service And Repair Near Me Villa Park, CA
Rv Service And Repair Near Me Villa Park, CA
Rv Refrigerator Repair Near Me Villa Park, CA
Rv Mechanics Near Me Villa Park, CA
Rv Delamination Repair Near Me Villa Park, CA
Rv Repairs Near Me Villa Park, CA
Rv Solar Panel Installation Villa Park, CA
Rv Plumbing Repair Near Me Villa Park, CA
Rv Solar Installation Villa Park, CA
Rv Delamination Repair Near Me Villa Park, CA
Rv Repair In My Area Villa Park, CA
Motorhome Generator Repair Near Me Villa Park, CA
Rv Plumbing Repair Near Me Villa Park, CA
Full Service Rv Repair Near Me Villa Park, CA
Rv Repair Centers Near Me Villa Park, CA
Rv Repairs Near Me Villa Park, CA
Motorhome Generator Repair Near Me Villa Park, CA
Motorhome Repair Shop Villa Park, CA
Best Rv Repair Near Me Villa Park, CA
Camper Ac Repair Near Me Villa Park, CA
Rv Delamination Repair Near Me Villa Park, CA
Motorhome Awning Repair Villa Park, CA
Motorhome Repair Service Villa Park, CA
Motorhome Repair Shop Villa Park, CA
Motorhome Refrigerator Repair Villa Park, CA
Full Service Rv Repair Near Me Villa Park, CA
Rv Floor Repair Near Me Villa Park, CA
Rv Solar Installation Villa Park, CA
Rv Service Repair Near Me Villa Park, CA
Rv Ceiling Repair Villa Park, CA
Rv Solar Installation Villa Park, CA
Motorhome Repair Service Villa Park, CA
Rv Delamination Repair Near Me Villa Park, CA
Motorhome Awning Repair Villa Park, CA
Camper Ac Repair Near Me Villa Park, CA
Rv Plumbing Repair Near Me Villa Park, CA
Motorhome Refrigerator Repair Villa Park, CA
Rv Repairs Near Me Villa Park, CA
Motorhome Service And Repair Near Me Villa Park, CA
Motorhome Refrigerator Repair Villa Park, CA
Rv Repair In My Area Villa Park, CA
Full Service Rv Repair Near Me Villa Park, CA
Rv Service Repair Near Me Villa Park, CA
Motorhome Awning Repair Villa Park, CA
Motorhome Generator Repair Near Me Villa Park, CA
Motorhome Repair Near Me Villa Park, CA
Rv Repair In My Area Villa Park, CA
Rv Service Repair Near Me Villa Park, CA
Rv Repair Service Near Me Villa Park, CA
Rv Plumbing Repair Near Me Villa Park, CA
Rv Generator Repair Villa Park, CA
Find A Good Local Seo Pricing Villa Park, CA
Find A Seo Package Villa Park, CA
Rv Repairs Near Me Villa Park, CA
OCRV Center
Table of Contents
- – Motorhome Refrigerator Repair Villa Park, CA
- – OCRV Center
- – Rv Repair Places Near Me Villa Park, CA
- – Rv Floor Repair Near Me Villa Park, CA
- – Rv Mechanics Near Me Villa Park, CA
- – Rv Repairs Near Me Villa Park, CA
- – Rv Repair Centers Near Me Villa Park, CA
- – Rv Repair Service Near Me Villa Park, CA
- – Rv Solar Panel Installation Villa Park, CA
- – Camper Ac Repair Near Me Villa Park, CA
- – Motorhome Generator Repair Near Me Villa Par...
- – Rv Plumbing Repair Near Me Villa Park, CA
- – Motorhome Service And Repair Near Me Villa P...
- – Motorhome Repair Shops Villa Park, CA
- – Motorhome Generator Repair Near Me Villa Par...
- – Motorhome Repair Service Villa Park, CA
- – Rv Floor Repair Near Me Villa Park, CA
- – OCRV Center
Latest Posts
Fifth Wheel Repair Near Me Tustin
Mercedes Sprinter Repair Near Me Montclair
Mercedes Benz Sprinter Repair Brea
More
Latest Posts
Fifth Wheel Repair Near Me Tustin
Mercedes Sprinter Repair Near Me Montclair
Mercedes Benz Sprinter Repair Brea