All Categories
Featured
Table of Contents
- – Rv Carpet Replacement Chino, CA
- – OCRV Center
- – Remodeling Rv Chino, CA
- – Rv Replacement Furniture Chino, CA
- – Replacement Rv Windows Chino, CA
- – Replacement Windows For Rv Chino, CA
- – Rv Restoration Companies Chino, CA
- – Rv Sofa Sleeper Chino, CA
- – Rv Replacement Awnings Chino, CA
- – Awnings For Trailers Chino, CA
- – Rv Refrigerator Replacement Chino, CA
- – Replacement Windows For Campers Chino, CA
- – Rv Sofa Beds Chino, CA
- – OCRV Center
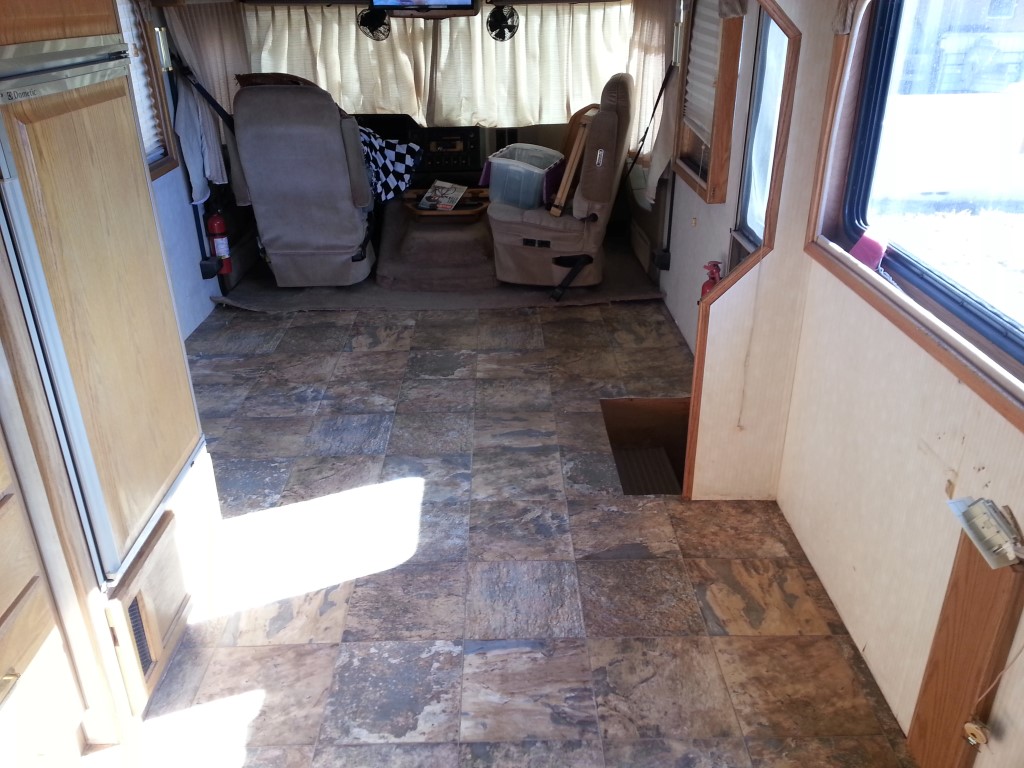
Rv Carpet Replacement Chino, CA
I'm gon na obtain all this linoleum out. I'm gon na get the vinyl back past the edge of the door, and then truly have a good look at exactly how points look.
Up below in this edge it's punky. It's soft sufficient that I think with a hammer and a level bar, I can begin tearing some plywood out of there. And what that little exploratory surgical procedure is gon na do is provide me a feeling for what the system resembles, which will then tell me, you understand, I assume eventually here, gon na end up running a round saw, and reducing to good wood and then changing the negative stuff.
Remodeling Rv Chino, CA
Like I said, I assume I can, I can peel sufficient of the poor stuff out of there to at least obtain a feeling for what I have. Well, honestly, where I go to that swiftly is enough to give me an excellent feeling for determining what I require to do next.
We can replace that as we get the brand-new floor in here also. What this will certainly let me do, seeing this, I believe what I can do following is obtain a circ saw reduced back below someplace, and then peel back to that point. We'll go from there and just maintain, like I stated previously, taking a bad floor out until we obtain to strong things.
Rv Replacement Furniture Chino, CA
Currently it's feasible that this is gon na come to be kind of L-shape, because in the facility of the camper over below, that floor seems rather excellent, yet naturally that poor spot is still there by the door, and this has to come out. So currently my schedule is cutting down to a joist right here someplace to reach solid wood.
Currently, the various other thing I wan na point out is this. When I took that first piece of plywood out, I did that cutting and I got rid of the material, and I recognized pretty fast, I must've had a mask on. There's a lot going on there. If nothing else, I'm producing a great deal of dust in a restricted area, so mask.
Replacement Rv Windows Chino, CA
One of things I do intend to mention, I'm being truly mindful working around the membrane that's under the flooring. And the factor is the membrane is actually still undamaged, and I don't wish to all of a sudden obtain my foot in the incorrect spot and step through it or something and placed a big tear in it.
I'm really thoroughly functioning around this by strolling just on the joists, the sleepers, and then likewise just being really, actually careful regarding where I step and where I put cams and stuff. Below's where I'm at. On this beyond the camper, one of the important things that's really good news is that the plates under of the walls are done in truly good condition, which truthfully stunned me for the condition of every little thing else in here.
On this specific wall, the joist, the last edge piece that's out right here outside of the camper is still there and it's in great shape. However the issue I'm up against is that if I do not sister something together with it below, when I are available in with plywood, I won't have anything to toenail the plywood to.
Replacement Windows For Rv Chino, CA
I indicate, all I'm doing is getting it in area, and then I'm going with screws for everything rather than nails just to make sure I get an excellent bite, and it remains stuck once it's in there. I'm just going to drive screw after screw after screw to safeguard these components with each other and make certain they remain stuck.
I'm getting that rim item in. And among the points to be cognizant of is that due to the skin outside of the trailer, I can't obtain bolts with this, the board we simply placed in and tie it into that. Instead I am utilizing angle irons here.
Talk much more about that. One of the things, one of the things too, that I desired to mention is that I did a switch, a screw switch, after I obtained started on that first piece, I was including back in. I recognized that those screws I was using were nowhere near husky adequate for what we were asking of them.
Rv Restoration Companies Chino, CA
Now with these, what that angle iron will do is connect these 2 assemble. And after that the other thing to remember here is that as soon as the deck comes on, once plywood comes on, and that overlays these pieces and all, and obtains fastened to them, that also is going to assist connect every little thing so that it connects these parts together.
So the angle iron plus the plywood is gon na help with that. And there's absolutely nothing, absolutely nothing fashionable about these. Hardware store stuff which impact driver, vroom, vroom. That's why I keep my hearing defense in, even when all I'm doing is driving screws. It's loud anyhow. And in a restricted setting like this, you know, once again, we intend to be safety and security mindful throughout this.
And the factor for that is I made use of a jigsaw, handheld jigsaw, and I reduced them back and they're not always cut back yet to the point where I'm at great wood, and I'm gon na tie into them. We'll enter into that yet. What I desired to do was reduced back where I recognized the ends were poor, and I required to offer some clearance to make it easy to get that rim item in.
Rv Sofa Sleeper Chino, CA
The following step is going to be start bringing those sleepers, the floor joists back in, and then from there insulation and plywood. More floor, flooring, floors are us.
And I possess a staple weapon and I might staple it, but I seemed like I desire something on that that I know is gon na be a little bit more durable link is, is certainly gon na keep that fabric tight. Here's my plan with that. I have actually obtained a table saw in the building, and we'll chat more regarding devices here in simply a second.
And I think it's really vital that this is treated due to the fact that it's going to live outside under the camper, not inside the camper. And of program the sleepers, the joists are on side (Chino Rv Floor Replacement).
Utilizing a counter sink in my drill, I have actually already pre-drilled these, and I did that so that when I begin driving screws, I don't take a chance of splitting these. I'm rather close to the next step, which is crawl underneath there, and drive screws via the pre-drilled openings.
Rv Replacement Awnings Chino, CA
We're getting all established up here. So the screws should also be exterior to ensure that they're gon na not corrosion away on you. Once you have actually obtained these ready now, like I said, we can get beneath there, and be some complicated video camera work to obtain this for you, however we'll get these secured up in place to the bottom of the sleepers.
And after that naturally, an option of hand devices, circ saw, belt sander, jigsaw, saws all. And with the larger tools, with the miter saw and the table saw, that was essential, because as I started to generate those brand-new joists that I was switching in, I really did not desire to need to constantly go to some various other store and cut parts, come back, cut components, return.
So next, , let's crawl under a camper. Well, I'm under the camper currently, undoubtedly, and you can see there, I've already obtained a number of battens in position and an additional one here. What I'm doing is really feeling via the fabric, and then there's a joist right there.
And then, brr, brr, should be able to just drive some screws. The batten is just acting like an actually big washing machine to make certain that that textile does not have the possibility to tear via and come loose.
Awnings For Trailers Chino, CA
The next thing inside here is to look for a factor where we obtain to excellent material, and then connect right into that with a brand-new piece in a method that structurally is gon na work. And additionally simply is easy sufficient to do. Allow me get some devices drawn together, and after that we'll look at out with the old and in with the brand-new below.
I have actually obtained a bad end, conveniently recognized, because that timber was in truly, really bad shape. I'm looking for a part here where it gets noise.
Rv Refrigerator Replacement Chino, CA
If I had to come back better with the system I will utilize below, I would be all right with that. Chino Rv Floor Replacement. If in order to get rid of bad product, I had to reduce back right here where I'm not over a steel structure element, I would do that. What I have actually done so much is situated the steel
And the following point, let's obtain that bad place cut out. And what I want to do as I cut is also lift a little bit. And I've already got a brand-new item cut.
And right here's the thing. And the way this is gon na job is we're gon na bridge that seam with those plywood scraps. And coupled with the plywood, we're going to include glue and screws, and that is truly gon na make this generally simply like having one long item once more when we're done.
I have obtained in my warm little hands, another item to go on that side. I just have to obtain my platform out of the means here.
Replacement Windows For Campers Chino, CA
And when this is done, that is gon na be an actually, truly solid system. Right here's a large minute. The last piece of plywood will get placed in, but let's talk about a pair things. Notification the insulation in the flooring. I've protected the floor with what's called mineral wool or rock woollen insulation.
Due to the fact that of using that, that's part of the reason that I wanted to make sure those battens obtained under the textile. And the reason being that that mineral woollen, it's got some thickness to it.
So when I'm cutting this piece, the piece that's gon na fill out here, I would love to keep the factory edge on that end butting versus the factory side that's already in place, and afterwards the cut edge heads out below up versus the wall surface. Currently, if you need to do a trim, you need to do a trim, and in this instance I did.
So if you obtained ta do it, you obtained ta do it, however it in the perfect globe, manufacturing facility side to manufacturing facility edge right here on the lengthy joints, and on the short seams where pieces are fulfilling. The various other thing is that we intend to be half on a joist. So what I suggest by that is that this portion of plywood is half on this joist, and afterwards the following item of plywood is gon na come on right here, so it's got something to be secured to, and that's simply a, you know, a building guideline that you always comply with when you're doing flooring or roof covering.
Rv Sofa Beds Chino, CA
There aren't any type of chunks of insulation laying on top of the framework. I have got, if you watch out below, I have actually obtained these areas noted on the wall, so that as I come with a screw gun, more on that in a second, I understand that sleeper, that joist is there, facility is there, center is there.

I do not have a stapler that'll do that, yet I do have a screw gun that I can utilize to drive long screws. All right, a whole lot of chatting, and allow's look at getting the plywood to come in.
Well, we ended with a great deal of screwing around.The whole flooring was a great deal of screwing about. Just a great deal of little picky points to do to get this right, but certainly worth doing, due to the fact that undoubtedly there were some bad spots in right here that needed to go. With those screws, if there's any type of area where you really feel like you may've missed out on, get a common cordless screwdriver, back those screws out.
Replacement Rv Refrigerator Chino, CAAwning Installation Chino, CA
Rv Refrigerator Replacement Chino, CA
Rv Replacement Awnings Chino, CA
Rv Carpet Replacement Chino, CA
Replacement Windows For Rv Chino, CA
Rv Dinette Table Chino, CA
Rv Carpet Installation Chino, CA
Remodeling Rv Chino, CA
Motorhome Carpets Chino, CA
Replacement Windows For Rv Chino, CA
Replace Rv Flooring Chino, CA
Replacement Rv Windows Chino, CA
Rv Replacement Furniture Chino, CA
Rv Restoration Companies Chino, CA
Rv Couch Bed Chino, CA
Replacement Windows For Campers Chino, CA
Rv Carpet Installation Chino, CA
Rv Interior Remodel Chino, CA
Rv Restoration Companies Chino, CA
Rv Restoration Companies Chino, CA
Rv Microwave Replacement Chino, CA
Rv Sofa Sleeper Chino, CA
Replacement Windows For Rv Chino, CA
Replacement Windows For Rv Chino, CA
Rv Dinette Booth Chino, CA
Rv Dinette Table Chino, CA
Rv Replacement Furniture Chino, CA
Replacement Windows For Campers Chino, CA
Rv Refrigerator Replacement Chino, CA
Rv Couch Chino, CA
Rv Dinette Table Chino, CA
Awning Installation Chino, CA
Rv Dinette Table Chino, CA
Rv Floor Replacement Chino, CA
Awning Installation Chino, CA
Rv Carpet Replacement Chino, CA
Rv Floor Replacement Chino, CA
Rv Interior Remodel Chino, CA
Rv Upholstery Chino, CA
Rv Replacement Awnings Chino, CA
Replacement Windows For Campers Chino, CA
Rv Sofa Beds Chino, CA
Rv Carpet Installation Chino, CA
Rv Microwave Replacement Chino, CA
Awning Installation Chino, CA
Rv Sofas Chino, CA
Rv Dining Table Chino, CA
Rv Dining Table Chino, CA
Rv Interior Remodel Chino, CA
Rv Sofas Chino, CA
Remodeling Rv Chino, CA
Rv Couch Bed Chino, CA
Rv Floor Replacement Chino, CA
Replacement Rv Windows Chino, CA
Motorhome Carpets Chino, CA
Rv Couch Chino, CA
Rv Interior Furniture Chino, CA
Rv Floor Replacement Chino, CA
Rv Carpet Installation Chino, CA
Rv Dining Table Chino, CA
Rv Interior Remodel Chino, CA
Rv Sofas Chino, CA
Rv Carpet Installation Chino, CA
Replacement Windows For Rv Chino, CA
Replacement Rv Refrigerator Chino, CA
Rv Microwave Replacement Chino, CA
Rv Interior Furniture Chino, CA
Rv Dinette Booth Chino, CA
Replacement Windows For Rv Chino, CA
Remodeling Rv Chino, CA
Rv Floor Replacement Chino, CA
Rv Dining Table Chino, CA
Rv Replacement Furniture Chino, CA
Rv Couch Chino, CA
Remodeling Rv Chino, CA
Rv Refrigerator Replacement Chino, CA
Rv Carpet Replacement Chino, CA
Close To Me Seo Company Near Me Chino, CA
Finding A Good Seo For Law Firms Chino, CA
OCRV Center
Table of Contents
- – Rv Carpet Replacement Chino, CA
- – OCRV Center
- – Remodeling Rv Chino, CA
- – Rv Replacement Furniture Chino, CA
- – Replacement Rv Windows Chino, CA
- – Replacement Windows For Rv Chino, CA
- – Rv Restoration Companies Chino, CA
- – Rv Sofa Sleeper Chino, CA
- – Rv Replacement Awnings Chino, CA
- – Awnings For Trailers Chino, CA
- – Rv Refrigerator Replacement Chino, CA
- – Replacement Windows For Campers Chino, CA
- – Rv Sofa Beds Chino, CA
- – OCRV Center
Latest Posts
Senior Insurance Plans Garden Grove
Insurance Senior Citizens Rancho Santa Margarita
Fullerton Best Individual Health Insurance Plans
More
Latest Posts
Senior Insurance Plans Garden Grove
Insurance Senior Citizens Rancho Santa Margarita
Fullerton Best Individual Health Insurance Plans