All Categories
Featured
Table of Contents
- – Norcold Rv Refrigerator Repair Pomona, CA
- – OCRV Center
- – Motorhome Repair Shop Near Me Pomona, CA
- – Norcold Rv Refrigerator Repair Pomona, CA
- – Rv Windshield Repair Near Me Pomona, CA
- – Rv Generator Repair Near Me Pomona, CA
- – Rv Air Conditioning Repair Near Me Pomona, CA
- – Rv Windshield Repair Near Me Pomona, CA
- – Rv Window Repair Near Me Pomona, CA
- – Rv Air Conditioning Repair Pomona, CA
- – Norcold Repair Pomona, CA
- – OCRV Center
Norcold Rv Refrigerator Repair Pomona, CA
Since of our substantial stock and skilled auto mechanics, the majority of cooling problems can be solved within 24 hours even if there is a requirement for an A/C system overhaul - Rv Mechanic Pomona. If you have any kind of questions regarding whether we can complete your recreational vehicle maintenance, we invite you to offer us a phone call at and talk with one of our staff
Rather you take your automobile, truck or van to an auto store. If you require cars and truck repair service in the area, you can call a to repair your auto right in your driveway or on the side of the roadway.
You can arrange an automotive service at your home or in the parking whole lot at the office, which is far less complicated and a lot more practical than rushing to the store on your lunch break. If you are stranded beside the road, a mobile auto mechanic may be able to fix your vehicle right away and save you the expense of a tow truck.
Who wants to go to a technician's shop when the can comes to you and me, especially if the cars and truck is in-need of a.
Inspect and Caulk roof where roofing. Check Recreational vehicle heater tidy heater blower, combustion chamber and control compartment, eliminating any type of dirt. Check Recreational vehicle hot water heating system flush holding storage tank, manually run stress temperature alleviation valve and clean heater tube (as described by the maker) as essential.
Motorhome Repair Shop Near Me Pomona, CA
Keeping your rooftop air conditioner clean and blockage complimentary will improve the performance of the device(s). Clean and align the Recreational vehicle Air conditioning evaporator and condenser coils.
We work on all dimensions and versions of RV air conditioners and have years of experience in Recreational vehicle air conditioning repairs and installment. Call the pros at Final Touch RV for all your suggested manufacturer Recreational vehicle air conditioning maintenance or Recreational vehicle air conditioning repair work.
See Habitat Canada to browse Habitat ReStore accepts from people and business. Each ReStore is distinct, and many locations likewise accept things outside these groups. ReStore isn't like various other thrift shops. The cash increased by Habitat ReStores assists family members construct a respectable and economical location to call home. When the products you contribute to ReStore are offered, the money helps construct homes, areas and hope.
Environment ReStores divert numerous tons from garbage dumps each year, accepting hard-to-dispose-of products consisting of new and secondhand furnishings, devices and surplus building products. Best of all, proceeds from the sale of these contributed goods assist families develop a foundation for the future. Our company partnerships assist make our work at Habitat feasible, and we provide collaboration possibilities for companies desiring to donate overstock materials and join reoccuring contribution programs.
Norcold Rv Refrigerator Repair Pomona, CA
You additionally can find out more on Environment for Humankind's gifts-in-kind donations page. Head over to the support page to discover even more means to contribute to Habitat for Mankind.
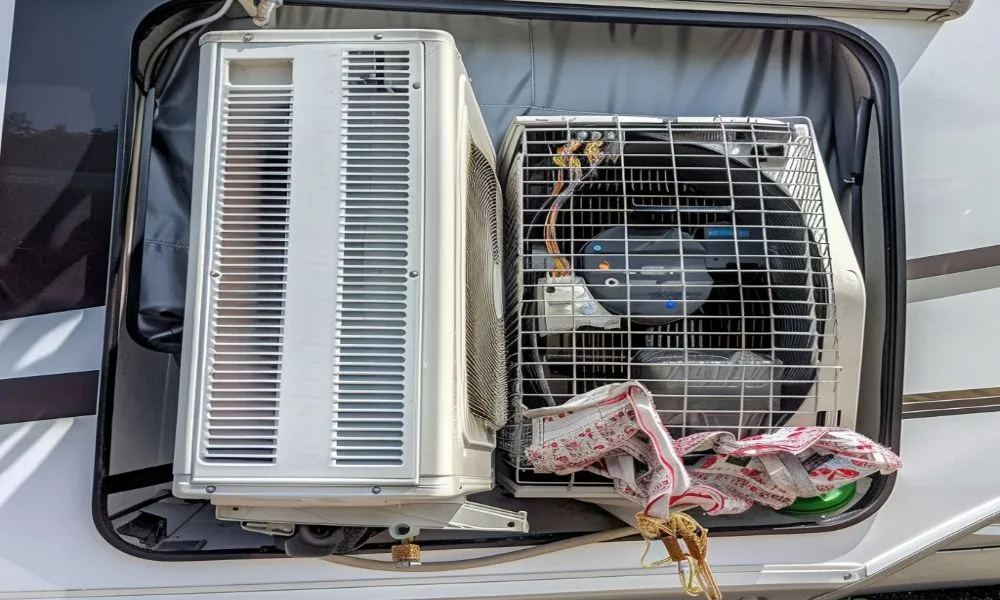
This is where the cooling agent is pressed back right into a fluid, and the warmth is launched through the condenser coils. This is a closed a/c system where no air is included or removed from your recreational vehicle. The total system of a recreational vehicle Roof A/c contains a closed system and air moving system.
In your RV-sealed system, the biggest elements are the compressor, condenser, and evaporator. They are what work with each other to flow air, eliminating warm when exterior temperatures climb and chilly when they begin to dip. The 2nd system is a simple electric motor and 2 fans. In between these 2 systems, there are different elements that can be pricey to replace.
Rv Windshield Repair Near Me Pomona, CA
One of the most typical RV air conditioning troubles we obtain ask for include air conditioners not turning on and the air not staying on top of the outside heat. If your RV air conditioning system won't turn on, the initial step to take is to guarantee your 110v outlets are operating properly. If they are it's feasible that a breaker has stumbled and merely requires to be reset.
For this, you may require to utilize tools such as a vacuum with a brush accessory to eliminate crud from the AC coils directly, and when it comes to the condenser coils, you might need additional devices to access the coils and a ladder to access the roofing. When these actions are executed routinely, they guarantee your RV AC system is operating with the least quantity of resistance and, as a result, functioning at its ideal.
Rv Generator Repair Near Me Pomona, CA
Gives more adaptability with accessibility to a smaller, additional automobile for discovering and extra living area. Provides the ideal rent-and-go choice and allows for simpleness when it comes to establishing camp, simply shift the RV right into park.
As soon as you get in an address, if no places are returned, expand the mileage span to a higher distance. The listing that shows up will certainly be in order of closest to furthest away from you. If even after broadening your mileage radius a number of times, should no results appear, clear your cache and refresh your web browser.
RVers can rapidly exceed the readily available wattage by operating other home appliances, like a microwave, electrical water heating system component, or refrigerator at the same time. Try turning among the various other devices off and evaluate the ac system again. Reduced voltage can trigger a boost in amperage going through the air conditioning system, which subsequently triggers the breaker to trip in the electrical panel.
Occasionally check the plenum or dam location of your motor home by getting rid of the above ceiling cover where the return air filter and/or controls lie. Usage a/c foil tape to secure off trouble locations where the trendy air supply may be blending with warm air. Even the smallest openings can create problems.
Rv Air Conditioning Repair Near Me Pomona, CA
A malfunctioning a/c unit is one of the troubles that RVers fear one of the most in cozy weather. A family holiday is a whole lot much less enjoyable when you're sweating all the time. When it concerns major damages or malfunctions, you are much better off depending on a professional or replacing the whole device.
Reset the system by following the directions in your system guidebook (Rv Mechanic Pomona). After a tough reset, if you still do not have power, there can be a concern with your circuit card or thermostat. Inspect your service warranty before trying to fix it on your own and speak with a specialist. It deserves noting, however, that fixings like this might be costly and unworthy the investment, so it might be time to replace your unit.
Rv Windshield Repair Near Me Pomona, CA
You might need to change the gaskets. Over time, rubber gaskets can grow breakable and stop functioning as they must to shield your AC unit and Recreational vehicle.
In your Recreational vehicle or your home one of the most aggravating A/c unit issues is when the system is running, yet not blowing out cool air. This might be just an issue of giving your Recreational vehicle air conditioner an extensive cleaning.
While frequently cleaning your system is important to the basic upkeep, it might not always resolve this particular trouble. If your device relies on Freon for air conditioning, it may be running low.
If the fixings get to be way too much, nonetheless, do not think twice to look for help or buy a new system that will certainly last you longer with the appropriate upkeep. When you discover yourself seeking a substitute component or a brand-new recreational vehicle air conditioning unit, you can count on MWSS for the best products and the most effective solution.
Rv Window Repair Near Me Pomona, CA
At En Course RV Provider, we understand that you wish to be an awesome, pleased camper in your RV while remaining in the south for the winter season. In order to do that, you require your RV ac unit to function. The issue is you can't wait on a two-week appointment, that makes you really feel hotter and not a satisfied camper.
We comprehend exactly how disappointed and warm you need to feel, which is why we supply the finest mobile RV air conditioner repair work by our certified service technicians. We offer you a date and time. Day prior to your appointment, you will obtain a message from us verifying your consultation.

Searching for a who will pertain to you and fix your car vehicle? The is "amazing". That wishes to go to a mechanic's shop when the can pertains to you and me, especially if the vehicle is in-need of a. Why pay even more for a? Instead have actually the or appeared to you.
Cost of Air Conditioning Service? Call today or book Air Conditioning Service online quickly! Finest mobile vehicle repair in Normal inspections assist guarantee cooling down performance and identify feasible refrigerant leakages.
Rv Air Conditioning Repair Pomona, CA
Your automobile's is liable for cooling, cleansing, and flowing air. Your air conditioning system works through a collection of procedures that entail refrigerant.
Substantial automobile a/c repair services can cost $400-$900 or more, depending on make and version. is the new means to get your car repair in the house, on the side of the road, at your office or anywhere else. Instead you take your automobile, vehicle or van to a vehicle store.
Norcold Repair Pomona, CA
OCRV Center
Address: 23281 La Palma Ave Yorba Linda, CA 92887Phone: (714) 909-1444
Email: art@ocrvcenter.com
OCRV Center
Excellent ones can look after regimen like oil adjustments, tire rotations and brake checks. They can additionally deal with most of emergency fixings, but before you commit, ask about the service's restrictions and make certain that you understand what to expect.
Rv Windshield Repair Near Me Pomona, CARv A/C Repair Near Me Pomona, CA
Rv Service And Repair Pomona, CA
Rv Air Conditioning Repair Near Me Pomona, CA
Rv Repair Shop Near Me Pomona, CA
Fiberglass Roof Repair Pomona, CA
Norcold Rv Refrigerator Repair Pomona, CA
Rv Generator Repair Near Me Pomona, CA
Rv Windshield Repair Pomona, CA
Rv Air Conditioning Repair Pomona, CA
Rv Mechanic Near Me Pomona, CA
Rv Engine Repair Near Me Pomona, CA
Rv Repair Shops Near Me Pomona, CA
Emergency Rv Repair Near Me Pomona, CA
Rv Fridge Repair Pomona, CA
Rv Ac Repair Pomona, CA
Onan Generator Repair Pomona, CA
Norcold Refrigerator Repair Pomona, CA
Rv A/C Repair Near Me Pomona, CA
Rv Air Conditioner Repair Pomona, CA
Rv Mechanic Near Me Pomona, CA
Rv A/C Repair Near Me Pomona, CA
Rv Service And Repair Pomona, CA
Rv Mechanic Pomona, CA
Rv Generator Repair Near Me Pomona, CA
Rv Service And Repair Pomona, CA
Fiberglass Roof Repair Pomona, CA
Rv Repair Shops Pomona, CA
Rv Air Conditioner Repair Pomona, CA
Norcold Refrigerator Repair Pomona, CA
Norcold Rv Refrigerator Repair Pomona, CA
Rv Windshield Repair Pomona, CA
Motorhome Generator Repair Pomona, CA
Fiberglass Roof Repair Pomona, CA
Rv A/C Repair Near Me Pomona, CA
Rv Ac Repair Pomona, CA
Dometic Refrigerator Repair Pomona, CA
Norcold Rv Refrigerator Repair Pomona, CA
Norcold Rv Refrigerator Repair Pomona, CA
Rv Windshield Repair Near Me Pomona, CA
Rv Generator Repair Near Me Pomona, CA
Motorhome Generator Repair Pomona, CA
Rv Window Repair Pomona, CA
Motorhome Generator Repair Pomona, CA
Rv Generator Repair Near Me Pomona, CA
Rv A/C Repair Near Me Pomona, CA
Rv Ac Repair Pomona, CA
Rv Windshield Repair Pomona, CA
Rv Air Conditioner Repair Near Me Pomona, CA
Rv Ac Repair Pomona, CA
Rv Windshield Repair Pomona, CA
Rv Windshield Repair Pomona, CA
Motorhome Air Conditioner Repair Pomona, CA
Rv Engine Repair Near Me Pomona, CA
Rv Generator Repair Near Me Pomona, CA
Fiberglass Roof Repair Pomona, CA
Rv Mechanic Pomona, CA
Rv Fridge Repair Pomona, CA
Fiberglass Roof Repair Pomona, CA
Rv Generator Repair Near Me Pomona, CA
Rv Fridge Repair Pomona, CA
Rv Air Conditioner Repair Pomona, CA
Rv Air Conditioning Repair Pomona, CA
Rv Air Conditioner Repair Pomona, CA
Rv Repair Shops Near Me Pomona, CA
Rv Window Repair Near Me Pomona, CA
Onan Generator Repair Pomona, CA
Norcold Refrigerator Repair Pomona, CA
Norcold Refrigerator Repair Pomona, CA
Onan Generator Repair Pomona, CA
Rv Windshield Repair Pomona, CA
Rv Repair Shop Near Me Pomona, CA
Onan Generator Repair Pomona, CA
Norcold Refrigerator Repair Pomona, CA
Motorhome Repair Shop Near Me Pomona, CA
Rv Windshield Repair Near Me Pomona, CA
Rv Air Conditioning Repair Near Me Pomona, CA
Rv Windshield Replacement Pomona, CA
Near Me Seo Agency Pomona, CA
Near You Seo Pricing Pomona, CA
OCRV Center
Table of Contents
- – Norcold Rv Refrigerator Repair Pomona, CA
- – OCRV Center
- – Motorhome Repair Shop Near Me Pomona, CA
- – Norcold Rv Refrigerator Repair Pomona, CA
- – Rv Windshield Repair Near Me Pomona, CA
- – Rv Generator Repair Near Me Pomona, CA
- – Rv Air Conditioning Repair Near Me Pomona, CA
- – Rv Windshield Repair Near Me Pomona, CA
- – Rv Window Repair Near Me Pomona, CA
- – Rv Air Conditioning Repair Pomona, CA
- – Norcold Repair Pomona, CA
- – OCRV Center
Latest Posts
Rv Couch Bed Montclair
Rv Awning Fabric Repair Foothill Ranch
Valley Village Kitchen Exhaust Fan Motor Replacement
More
Latest Posts
Rv Couch Bed Montclair
Rv Awning Fabric Repair Foothill Ranch
Valley Village Kitchen Exhaust Fan Motor Replacement