All Categories
Featured
Table of Contents
- – Rv Repair Service Near Me West Covina, CA
- – OCRV Center
- – Rv Repair Shops Near My Location West Covina, CA
- – Rv Repair Shops Near My Location West Covina, CA
- – Rv Repairs Near Me West Covina, CA
- – Rv Repair Shops Near My Location West Covina, CA
- – Rv Delamination Repair Near Me West Covina, CA
- – Motorhome Awning Repair West Covina, CA
- – Rv Delamination Repair Near Me West Covina, CA
- – Rv Repairs Near Me West Covina, CA
- – Rv Repair Centers Near Me West Covina, CA
- – Motorhome Generator Repair Near Me West Covi...
- – OCRV Center
Rv Repair Service Near Me West Covina, CA
We can deal with Dometic and Norcold recalls. We are certified Dometic and Norcold Guarantee Centers. Please give us a telephone call with the make and model number, we will certainly take it from there!
Legitimate just at getting involved CAMPING WORLD areas. See supplier for information. Federal government charges, state taxes, dealer costs and discharges testing fees as relevant will certainly be added to conform with state vehicle codes.
New unit photography for image objectives just. Supply and floorplans differ by location, not all marketed manufacturers readily available at getting involved dealers.
Rv Repair Shops Near My Location West Covina, CA
Might not be incorporated with any type of various other offer and not suitable to prior sales. Deal(s) legitimate at any type of Outdoor camping World Motor Home Sales or FreedomRoads dealership just. See dealer for details. 2025 FreedomRoads, LLC. CAMPING globe and the Outdoor Camping WORLD Logo are registered trademarks of CWI, LLC. and utilized with consent.
All rights scheduled. FreedomRoads LLC, its associated dealerships and innovation partners are exempt for mistakes in cost or errors in summary of condition of a car's recognized devices, accessories, cost or service warranties. Any and all distinctions should be dealt with prior to the sale of this car. Decision to market a recreational vehicle no matter of rate is only determined by the marketing dealer. * Best offer or $1,000 - offer should be in creating and acquired from a qualified RV dealer.
To obtain guaranteed trade-in worth and/or evaluation, automobile has to be in same or substantially the very same problem it was in at time of deal - Full Service Rv Repair Near Me West Covina. All offers are subject to examination.
Rv Repair Shops Near My Location West Covina, CA
Client needs to present valid buyers order authorized by administration of completing supplier and proper paperwork outlining model year, make, brand, model, choices, specifications, shades, and vin # of advertised unit. Buyers order valid for 1 month from time of write up. Contending supplier will certainly be any type of licensed recreational vehicle dealer as acknowledged by the State in which the dealer runs and is not an Outdoor Camping World Recreational Vehicle Sales or FreedomRoads dealer.
Any type of suitable trade-in has to be divulged and offered for evaluation at time of demand. Not suitable to prior sales. See dealer for details. Not valid in The golden state. Void where prohibited. For official Grand Layout motor home refund conditions, please browse through .
Rv Repairs Near Me West Covina, CA
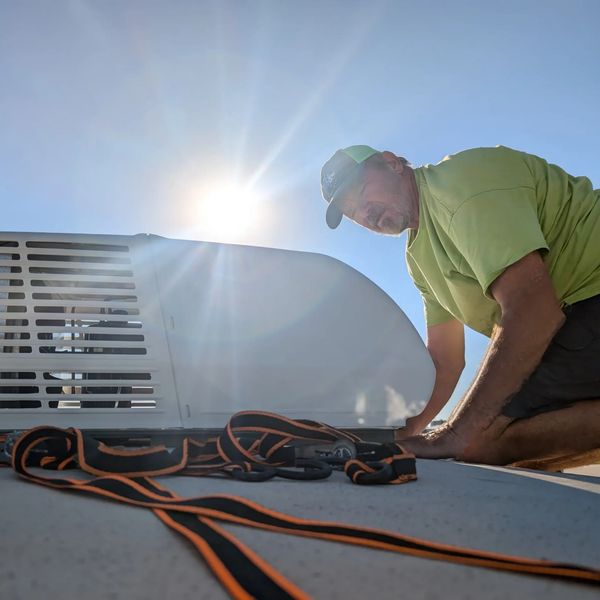
The brand-new Dometic AC unit was set up with precision, sticking to manufacturer guidelines to make certain optimum performance and longevity. After installment, we performed a collection of tests to confirm that the new a/c unit was working appropriately and effectively. This step is crucial to ensure that the system will perform dependably throughout future travels.
Whether you're preparing a weekend break getaway to Yard of the Gods or a cross-country journey, ensuring that your recreational vehicle systems remain in prime problem is essential. At Western Sky Mobile Motor Home Fixing, we specialize in supplying expert motor home fixing and substitute solutions, aiding you delight in a problem-free RV experience. Full Service Rv Repair Near Me West Covina. Call us today to read more about our solutions and just how we can assist with your RV needs
Rv Repair Shops Near My Location West Covina, CA
Our group is trained to spot and repair these certain, common auto Air conditioning issues effectively. Worn seals or damaged tubes cause cooling agent to leakage, which is the most typical factor your Air conditioning strikes warm air.

Our team of experienced service technicians is educated to detect and fix any concerns with your car's A/c system. Whether it's a minor repair work or a complete Air conditioner system overhaul, we have the competence to get your auto's air conditioner blowing cold once again.
Our well-informed professionals will certainly evaluate your a/c system to recognize any kind of leakages, worn-out elements, or electrical concerns. With our modern devices and high quality components, we can successfully repair your car a/c system and recover your convenience throughout those hot summer season days.
Offered to competent buyers based on lending institution debt credentials. Legitimate only at participating CAMPING WORLD locations. See supplier for information. Void where banned. Rates are comprehensive of all offered discount rates. Government fees, state taxes, supplier costs and discharges testing fees as relevant will be added to follow state automobile codes.
Rv Delamination Repair Near Me West Covina, CA
We have striven to ensure precision in the information supplied. New device photography for picture functions just. Specs, devices, technical data, photos and illustrations are based on information offered at time of posting and go through change without notification. Stock and floorplans vary by area, not all marketed producers readily available at participating dealers.
Might not be integrated with any various other deal and not suitable to previous sales. Deal(s) valid at any kind of Outdoor camping World Recreational Vehicle Sales or FreedomRoads dealer just. See dealer for information. 2025 FreedomRoads, LLC. CAMPING WORLD and the CAMPING WORLD Logo design are registered hallmarks of CWI, LLC. and utilized with consent.
Choice to market a RV regardless of price is exclusively established by the marketing supplier. * Ideal deal or $1,000 - deal should be in composing and obtained from a certified Motor home dealer.
To receive ensured trade-in worth and/or appraisal, lorry should remain in very same or significantly the very same condition it remained in sometimes of deal. All deals undergo inspection. $1,000 cash money will certainly hurt in the kind of money, check, or cash order. Not legitimate in LA or OR.
Motorhome Awning Repair West Covina, CA
Customer needs to present legitimate buyers order authorized by administration of completing dealer and appropriate documents detailing design year, make, brand, model, choices, specs, colors, and vin # of advertised system. Purchasers order legitimate for one month from time of write up. Completing supplier will be any type of qualified RV car dealership as recognized by the State in which the dealer runs and is not an Outdoor Camping Globe Motor Home Sales or FreedomRoads supplier.
Any type of applicable trade-in needs to be divulged and attended to assessment sometimes of request. Not relevant to prior sales. See dealer for information. Not valid in The golden state. Gap where forbidden. For main Grand Style recreational vehicle rebate conditions, please browse through .
Rv Delamination Repair Near Me West Covina, CA
We can deal with Dometic and Norcold remembers. We are accredited Dometic and Norcold Service Warranty Centers. Please provide us a telephone call with the make and model number, we will take it from there!
Is your car's air conditioning system blowing cozy air or no air in any way? If it's blowing, we'll ask you to come by for an Evac & Recharge solution. A professional will utilize a special device to take the existing cooling agent out of your air conditioning unit and after that re-fill it with the correct amount.
Rv Repairs Near Me West Covina, CA
Unpleasant mold and mold odors originate from your Air conditioning vents. The Air conditioner works only while the car is in movement. If your cars and truck's Air conditioning isn't running at peak effectiveness, a visit to Diesel Power of Virginia Inc - Harvey's Transmissions is a sensible move.
If your car's a/c begins to lose its cooling effectiveness, think about a freon recharge. This quick and cost-efficient solution brings back cool air, providing relief from the warmth. Know that if there's a freon leakage, it might be as a result of a harmed hose or seal, which may require a lot more substantial repair services.
The Thermal Growth Shutoff or Orifice Tube is vital for controling your a/c system's pressure and temperature, controlling the flow of cooling agent right into the evaporator. Proper balance avoids moisture accumulation, vital for preserving your car's a/c performance. Never, a minimum of not in the means you believe of your oil being changed.
Rv Repair Centers Near Me West Covina, CA
It is advised to have your engine running while charging your cars and truck's A/C system. A cooling agent leak can lead to a loss of stress in the AC system, resulting in a failing to produce cool air.
Check and Caulk roof covering where necessary. Visual inspection of axles, center and lube where feasible. Inspect RV heater clean furnace blower, burning chamber and control compartment, removing any kind of dirt. Evaluate RV warm water heating unit flush holding container, manually operate pressure temperature safety valve and clean heater tube (as laid out by the manufacturer) as necessary.
Maintaining your roof air conditioning system clean and blockage complimentary will certainly improve the performance of the system(s). Examine the overall condition of your a/c system(s). Remove all objects and particles from AC device(s) and drain openings. Clean and correct the motor home AC evaporator and condenser coils. Examine the air conditioning Device(s) for 20 minutes to document temperature level and amperage as figured out by manufacturer requirements.
Our service division is staffed with highly educated specialists committed to making certain your MOTOR HOME stays in magnum opus order for years to come. Right here at Wagner's Outdoor Express motor home, we understand that going out when driving and appreciating our terrific country is your top priority, and we will aid keep you taking a trip in comfort and style.
Motorhome Generator Repair Near Me West Covina, CA
Offer us a phone call and we'll get you in and out of the store in an efficient and prompt manner, so you can return to experiencing the liberty that the motor home way of life provides. We are honored to offer high quality service in the Falling Seas area. LOOK INTO OUR NEW SEAL TECH LEAKAGE SPOTTING SERVICE.
OCRV Center
Address: 23281 La Palma Ave Yorba Linda, CA 92887Phone: (714) 909-1444
Email: art@ocrvcenter.com
OCRV Center
Includes examination of tires, brake shoes and wheel bearings. Repacking and cleaning of the bearings. Inspect all outside lights. Inspect brake operations. Manufacturers recommend that you check your recreational vehicle roofing system annually. We carry out the adhering to solutions to maintain your roof in tip leading condition: Rubber roof cleaningApply UV-blocking treatmentPerform roof leak checksRoof repairsRoof seams sealed Includes roof wash, roof inspection and roll/spray on roofing conditioning therapy.
Rv Ceiling Repair West Covina, CARv Repair And Service Near Me West Covina, CA
Rv Mechanics Near Me West Covina, CA
Motorhome Generator Repair Near Me West Covina, CA
Motorhome Generator Repair Near Me West Covina, CA
Rv Plumbing Repair Near Me West Covina, CA
Rv Repair Services Near Me West Covina, CA
Rv Repair Shops Near My Location West Covina, CA
Rv Refrigerator Repair Near Me West Covina, CA
Rv Repair And Service Near Me West Covina, CA
Rv Repair Centers Near Me West Covina, CA
Motorhome Repair Shops West Covina, CA
Rv Service And Repair Near Me West Covina, CA
Rv Mechanics Near Me West Covina, CA
Rv Repairs Near Me West Covina, CA
Rv Delamination Repair Near Me West Covina, CA
Best Rv Repair Near Me West Covina, CA
Motorhome Repair Service West Covina, CA
Motorhome Repair Service West Covina, CA
Rv Repair Shops Near My Location West Covina, CA
Rv Repair Services Near Me West Covina, CA
Rv Solar Panel Installation West Covina, CA
Motorhome Generator Repair Near Me West Covina, CA
Motorhome Service And Repair Near Me West Covina, CA
Rv Generator Repair West Covina, CA
Rv Mechanics Near Me West Covina, CA
Rv Solar Panel Installation West Covina, CA
Motorhome Repair Shops West Covina, CA
Rv Repair Shops Near My Location West Covina, CA
Motorhome Generator Repair Near Me West Covina, CA
Full Service Rv Repair Near Me West Covina, CA
Rv Repair Centers Near Me West Covina, CA
Motorhome Repair Shops West Covina, CA
Rv Repairs Near Me West Covina, CA
Full Service Rv Repair Near Me West Covina, CA
Rv Repairs Near Me West Covina, CA
Motorhome Repair Service West Covina, CA
Rv Solar Installation West Covina, CA
Best Rv Repair Near Me West Covina, CA
Rv Repair Places Near Me West Covina, CA
Rv Repair Places Near Me West Covina, CA
Rv Repair Services Near Me West Covina, CA
Motorhome Awning Repair West Covina, CA
Motorhome Repair Service West Covina, CA
Best Rv Repair Near Me West Covina, CA
Motorhome Refrigerator Repair West Covina, CA
Full Service Rv Repair Near Me West Covina, CA
Motorhome Awning Repair West Covina, CA
Rv Refrigerator Repair Near Me West Covina, CA
Full Service Rv Repair Near Me West Covina, CA
Motorhome Service And Repair Near Me West Covina, CA
Rv Generator Repair West Covina, CA
Rv Repair Centers Near Me West Covina, CA
Rv Mechanics Near Me West Covina, CA
Best Rv Repair Near Me West Covina, CA
Rv Repair Shops Near My Location West Covina, CA
Rv Refrigerator Repair Near Me West Covina, CA
Rv Repair Centers Near Me West Covina, CA
Rv Generator Repair West Covina, CA
Motorhome Repair Shop West Covina, CA
Rv Repair And Service Near Me West Covina, CA
Rv Repair Places Near Me West Covina, CA
Motorhome Repair Shops West Covina, CA
Full Service Rv Repair Near Me West Covina, CA
Motorhome Service And Repair Near Me West Covina, CA
Full Service Rv Repair Near Me West Covina, CA
Rv Service And Repair Near Me West Covina, CA
Motorhome Repair Shops West Covina, CA
Rv Generator Repair West Covina, CA
Motorhome Awning Repair West Covina, CA
Rv Repair Centers Near Me West Covina, CA
Motorhome Refrigerator Repair West Covina, CA
Motorhome Repair Near Me West Covina, CA
Rv Service And Repair Near Me West Covina, CA
Rv Service Repair Near Me West Covina, CA
Rv Solar Installation West Covina, CA
Rv Repair Shops Near My Location West Covina, CA
Rv Floor Repair Near Me West Covina, CA
Find A Seo Companies West Covina, CA
In My Area Seo Services West Covina, CA
OCRV Center
Table of Contents
- – Rv Repair Service Near Me West Covina, CA
- – OCRV Center
- – Rv Repair Shops Near My Location West Covina, CA
- – Rv Repair Shops Near My Location West Covina, CA
- – Rv Repairs Near Me West Covina, CA
- – Rv Repair Shops Near My Location West Covina, CA
- – Rv Delamination Repair Near Me West Covina, CA
- – Motorhome Awning Repair West Covina, CA
- – Rv Delamination Repair Near Me West Covina, CA
- – Rv Repairs Near Me West Covina, CA
- – Rv Repair Centers Near Me West Covina, CA
- – Motorhome Generator Repair Near Me West Covi...
- – OCRV Center
Latest Posts
Hvac Installation Service Alhambra
Eastvale Web Design And Development Services
Swamp Cooler Pan Repair Los Angeles
More
Latest Posts
Hvac Installation Service Alhambra
Eastvale Web Design And Development Services
Swamp Cooler Pan Repair Los Angeles