All Categories
Featured
Table of Contents
- – Best Garage Ventilation Alhambra, CA
- – Instant Air Solutions
- – Garage Wall Exhaust Fan Alhambra, CA
- – Industrial Ventilation Solutions Alhambra, CA
- – Industrial Air Ventilation Systems Alhambra, CA
- – Garage Exhaust System Alhambra, CA
- – Professional Roof Ventilation Services Alham...
- – Exhaust Fan Installers Alhambra, CA
- – Garage Exhaust Fan Alhambra, CA
- – Exhaust Fan Installer Alhambra, CA
- – Instant Air Solutions
Best Garage Ventilation Alhambra, CA
I have actually had garage ventilation on my mind for time currently. In between Eileen and I always doing jobs in the garage, we create a great deal of fumes from paint and staining. Trimming wood in there additionally throws a great deal of sawdust right into the air. Also when I work with the mower and other little engines in there, the smell of fuel sticks around.
This was not the suitable service. Many painting and staining projects would sit in the garage overnight loading the air with fumes, just to be aired out when the sun showed up and when we can open up the garage doors. Apart from the noxious smells resting in the garage the following early morning, it would likewise delay the conclusion of these jobs.
To include in the stress, I just recently obtained a snow blower for the upcoming winter season snowstorms, which was bound to leave the garage loaded with gas smells after use. Also extra reason to check out garage air flow systems. Alhambra Industrial Exhaust Fan Installation Near Me. So I put my thinking cap on and roamed around the garage seeking air flow ideas.
In my previous home, I utilized to run a great deal of computer tools in the garage that would certainly generate a great deal of warmth. I had investigated garage venting options back then and resolved on a tiny fan and vent that can be set up straight in the garage door (by means of a little opening that you cut).
Garage Wall Exhaust Fan Alhambra, CA
Throughout the winter months, the garage door air vent would allow all the chilly air in and go down the garage temperature below the cold point, ruining my paints and various other liquids that were not meant to be iced up. The garage door vents and exhaust alternative left a negative preference in my mouth since, and I was figured out not to go after that direction once more.
I lastly worked out on a way of airing vent the garage. I would find a perfect venting area in the garage, and cut a large square hole in the wall surface (approximately 14"x14" in between the wall surface studs). I would certainly mount self-closing shutter vents on both the interior and exterior of the wall.
Industrial Ventilation Solutions Alhambra, CA
The double shutter vents were going to be key in assisting to maintain the chilly air outside throughout the winter months. I did a lot of study on exhaust fans and determined on one with built-in shutters.
For the exterior wall surface, I went a 14" aluminum shutter air vent (Alhambra Industrial Exhaust Fan Installation Near Me). With the hardware identified, I tried to find a perfect place for the air vent. The most effective area would certainly have been above one of the garage doors, however for looks, I didn't desire the vent to be noticeable from the street
Below's the location I selected inside for the garage exhaust fan: Below's where the air vent would certainly tire outdoors: Above, you'll see the first layer I went through was the drywall. Next was the white vinyl house siding.
The intermediary got a little harsh at some of the sides, however it was not a huge bargain. The follower would cover all the edges, and hide any type of abnormalities in my cut. Next, I had to seal the leading and bottom sides of the hole. This was an essential step to stop the fan from venting air right into the wall.
Industrial Air Ventilation Systems Alhambra, CA
I couldn't just reduce an opening in the home siding, insert the vent, and call it a day. To maintain water from permeating the home siding, I needed to utilize J channel. This would enable me to create a framework around the vent that would overlap the siding and secure the rough-cut edges from water.
I complied with some fantastic directions on (under the area "Set up J-channel around the home window"). Here's an image showing the set up J network pieces twisting around the air vent: Now came the fun job of collaborating with the home siding. To appropriately mount the outside vent, I required access to the wall surface beneath the home siding, which indicated getting rid of several pieces of house siding.
, I was able to conveniently detach some house siding, and pull it away from the wall. With enough of the house siding out of the method, I was able to proceed job on the opening.
Garage Exhaust System Alhambra, CA
Next, I inserted the shutter air vent and nailed it in the wall studs. Right here's a photo revealing some development: With the garage vent in area, I affixed the J channel framework, overlapping the rough cut edges of the plastic siding.
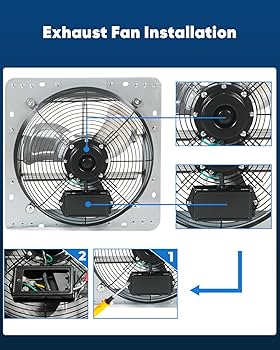
I put the exhaust fan in the hole and was getting ready to screw it into the studs. I made a decision to examine the vents on the fan to make sure they opened and shut properly.
After some fiddling, I uncovered that the opening I reduced was also snug of a suitable for the fan frame. It was distorting the frame ever so slightly to create the shutters to not shut appropriately. If I pulled the fan regarding 2 inches of the wall, the shutters worked fine.
I would developed a 24 wooden structure between the wall and the fan, to offer the exhaust fan enough range from the opening for the shutters to operate effectively. I actually spent only 10 mins on this task I sliced some 2x4s to size with the miter saw. I attached them to each various other with pocket opening screws to form a frame.
Professional Roof Ventilation Services Alhambra, CA
Below's a picture of the garage wall exhaust fan frame (the pocket holes are hidden on the various other side): At last, the exhaust follower might be bolted to the wall surface. I pressed the follower versus the 24 framework and saw to it the shutters opened and shut easily. I connected the follower to the 2x4s with some heavy-duty screws.
As the follower rate boosted to complete, both the within and outside shutters opened to wear down the garage. Below's an image of the installed garage wall exhaust fan (powered on) from the inside: Here's a photo of the outside of the garage wall exhaust fan, revealing the vents open with the fan on: I'm very excited about our new garage exhaust follower.
We had a moderate snow shower (regarding 4 inches), therefore I damaged out the snowblower to try it out. As predicted, when I completed getting rid of out the snow from the driveway and do away with the snowblower in the garage, the still-warm engine began to stink up the garage. I engaged the brand-new exhaust fan for a couple of hours, and the garage was back to regular.
The total cost of putting the vent follower in the garage was around $150 and was collectively concerning a day's well worth of work. If you require exhaust fans in the garage, this tutorial will certainly have your brand-new garage wall exhaust follower up and running in no time! I was actually delighted with the garage vent follower.
Exhaust Fan Installers Alhambra, CA
I did include one even more thing to our garage vent fan. I had actually been by hand transforming the follower on and off as required. I desired a far better system of transforming the fan off.
Of training course you want to see to it that the means the fan is switched on is hassle-free to you. Would certainly you intend to have more than one button? Perhaps a movement detector controller would certainly be also better? Currently is the moment to select. you need to have a supply of "make up air".
It might deserve it to run an air duct simply to require the air to flow across. If you desire to get expensive, you might incorporate some degreee of filtering system. This is outside the range of your concern but I always like to make sure a work area is well lighted with lots of lumens and as little glow as possible.
An exhaust follower's capacity is the quantity of air it can move, which is gauged in cubic feet per min (CFM).
Garage Exhaust Fan Alhambra, CA
Are you considering a do it yourself garage exhaust follower setup but unsure if it's actually needed? Let's break down the benefits and aid you determine if it's the ideal step for you. A good garage exhaust follower can do a lot even more than maintain things amazing. Here are several of the key benefits: Exhaust followers get rid of toxins, fumes, and smells that can build up in your garage.
Nonetheless, you may need to double the capacity if you run a store that produces whole lots of fumes or dirt. You have actually got a couple of choices when it pertains to the type of fan: These are typical and relatively very easy to set up. They go on your garage wall and get rid of the air through the outside wall.
Exhaust Fan Installer Alhambra, CA
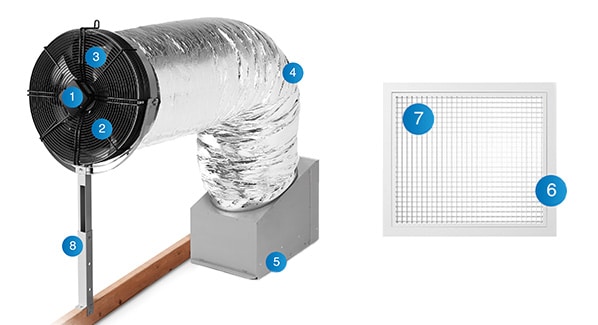
Now for the fun partinstalling the follower! It's not brain surgery yet calls for some fundamental do it yourself abilities. Here's a basic introduction of the procedure: Prior to starting, guarantee you have the right tools and products. You'll require things like: Safety and security glasses and gloves The exhaust follower itself A determining tape Cord adapters Wire cutters Screwdrivers A pencil Screws Jigsaw A drill Safety and security initially, folks! Prior to you start messing with electrical power, switch off the power to the circuit you'll be servicing.
Do you want it on the wall or the garage ceiling? As soon as you have actually picked your place, you have to cut an opening in the wall or ceiling.
Drill pilot openings in the corners of your marked area, and afterwards cut meticulously using a jigsaw. Now, it's time to link the follower to the electric circuitry. The following photo reveals an instance wiring representation for an exhaust follower and light managed by a button and timer. Things below can get a little difficult, so if you're not comfortable dealing with electricity, you could intend to hire a specialist.

Instant Air Solutions
Address: 412 W Dryden St Apt 6 Glendale, CA 91202Phone: (747) 307-6363
Email: instantairsolutionsinc@gmail.com
Instant Air Solutions
Doing so protects against air leaks and maintains out insects, guaranteeing your fan runs effectively. Check follower rate and guarantee air moves out of your garage, not in.
Carbon Monoxide Detector Installation Alhambra, CAGarage Ventilation Fan Installation Alhambra, CA
Professional Roof Ventilation Services Alhambra, CA
Install Garage Ventilation Fan Alhambra, CA
Exhaust Fan Installers Near Me Alhambra, CA
Local Seo Consultant Alhambra, CA
Close To Me Seo Citations Alhambra, CA
Industrial Exhaust Fan Installation Near Me Alhambra, CA
Instant Air Solutions
Table of Contents
- – Best Garage Ventilation Alhambra, CA
- – Instant Air Solutions
- – Garage Wall Exhaust Fan Alhambra, CA
- – Industrial Ventilation Solutions Alhambra, CA
- – Industrial Air Ventilation Systems Alhambra, CA
- – Garage Exhaust System Alhambra, CA
- – Professional Roof Ventilation Services Alham...
- – Exhaust Fan Installers Alhambra, CA
- – Garage Exhaust Fan Alhambra, CA
- – Exhaust Fan Installer Alhambra, CA
- – Instant Air Solutions
Latest Posts
Rv Couch Bed Montclair
Rv Awning Fabric Repair Foothill Ranch
Valley Village Kitchen Exhaust Fan Motor Replacement
More
Latest Posts
Rv Couch Bed Montclair
Rv Awning Fabric Repair Foothill Ranch
Valley Village Kitchen Exhaust Fan Motor Replacement